
Ever notice how a chord progression can suddenly create a stronger pull toward one chord, even though the overall key hasn’t changed?
One way this happens is through a secondary dominant. You temporarily treat a chord inside the key like its own destination and place its 5 chord before it.
In this lesson, you’ll learn how that relationship works, how to recognize it in a progression, and how to use it to create stronger harmonic movement.
Mastery Roadmap Focus · View Roadmap →
Choose one chord inside a familiar progression as your target. Find its 5 chord, place that chord or dominant 7 chord directly before the target, and compare the progression before and after the change. Listen for the stronger pull into the target chord.
What are secondary chords?
A secondary dominant temporarily functions as the 5 chord of a chord other than the tonic.
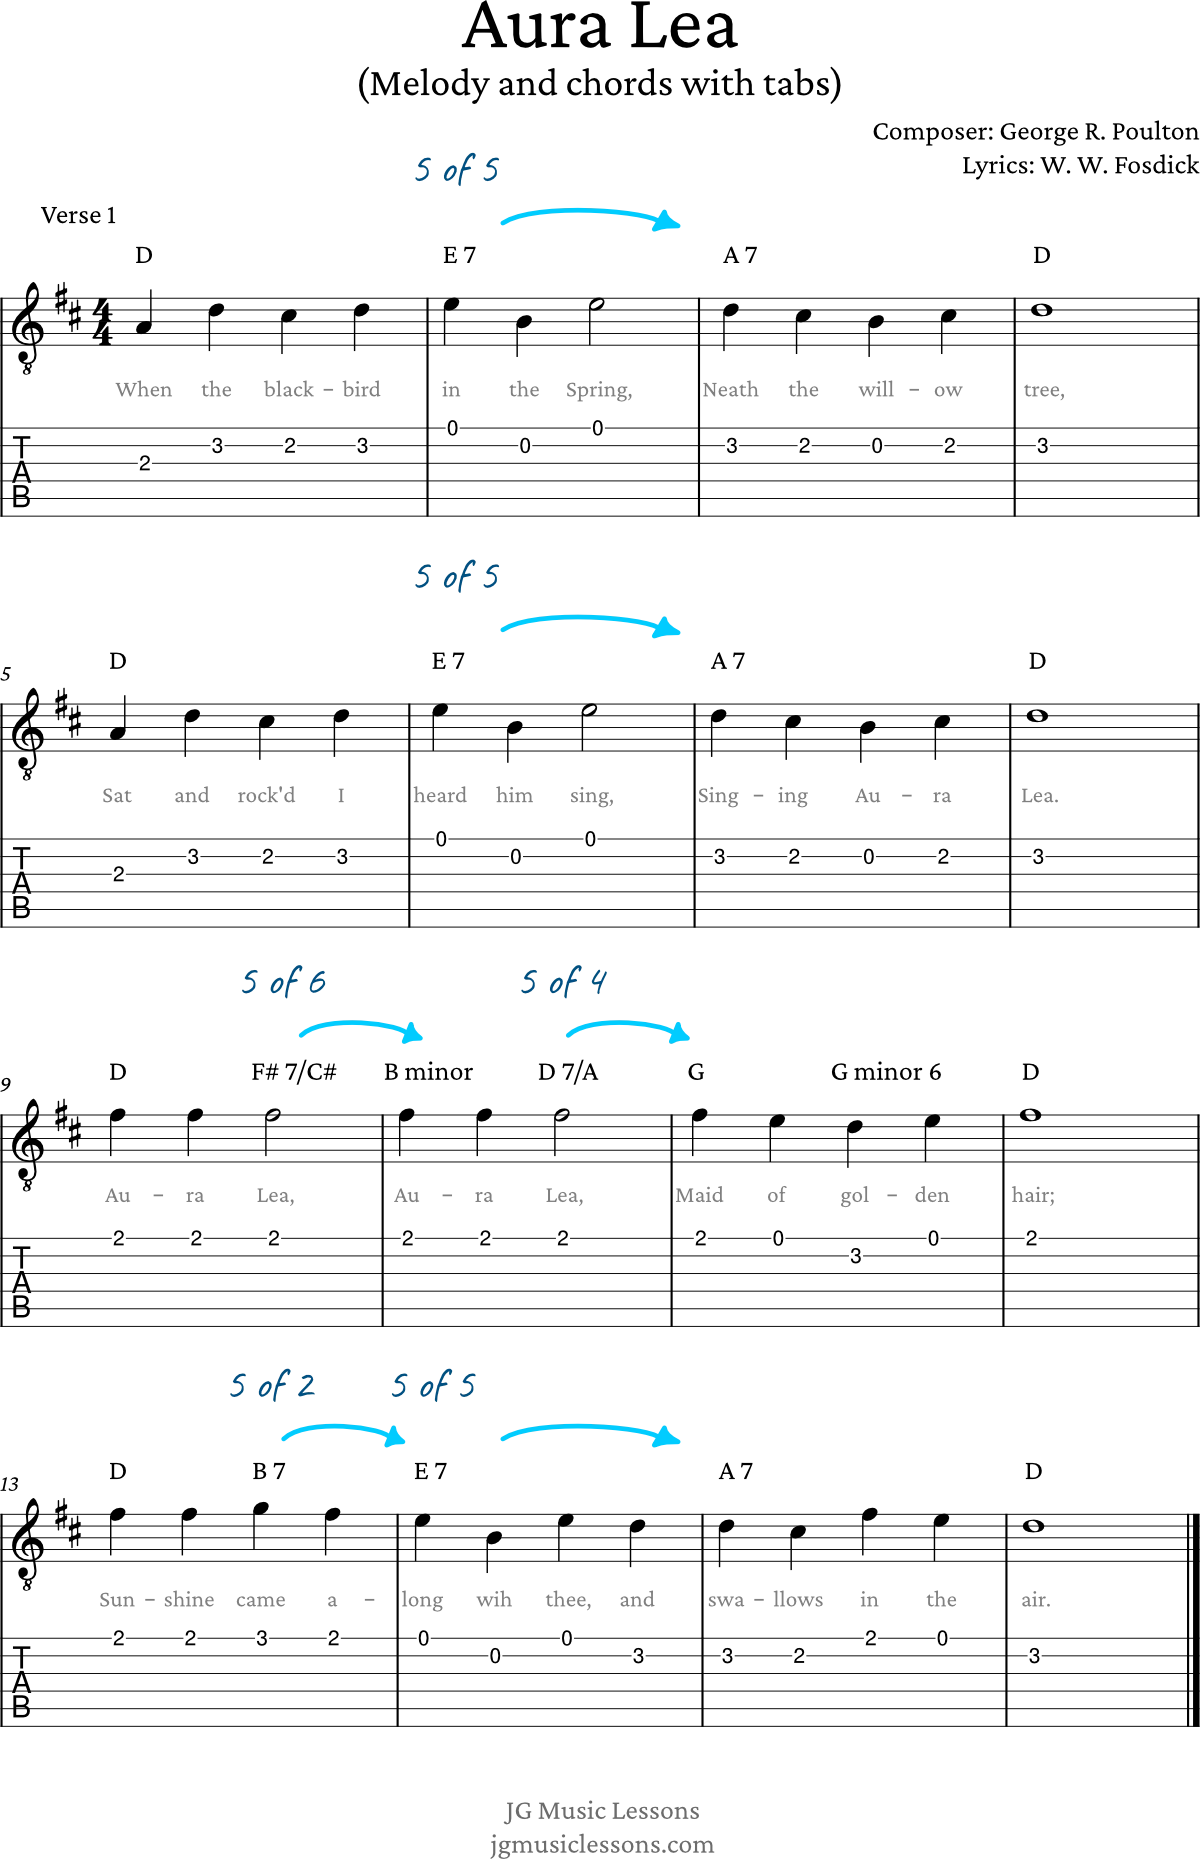
For example, in D Major, the 2 chord is normally E minor. If we use E Major or E7 before A Major, E now functions as the 5 of A. Since A is the 5 chord in D Major, E7 is called 5 of 5.
A dominant 7 chord has a particularly strong pull toward a chord whose root is a Perfect 4th above it. That’s why E7 resolves so clearly to A.
You can hear this move in action in a song like Aura Lea:
To create a secondary dominant, first choose the chord you want to emphasize. Then find the Major or dominant 7 chord whose root is a Perfect 5th above that target chord. For example, in C Major:
- A 7 → D minor = 5 of 2
- B 7 → E minor = 5 of 3
- C 7 → F Major = 5 of 4
- D 7 → G Major = 5 of 5
- E 7 → A minor = 5 of 6
Play C → Am → F → G. Then change it to C → E7 → Am → F → G. Listen specifically to E7 → Am. Identify E7 as 5 of 6, then switch back to the original progression and compare the amount of harmonic pull.
Most secondary chords do not belong to the diatonic chords of a scale, which is why they add tension or suspense to create a much more interesting chord progression. However, these chords make sense within a progression because they have a specific function of resolving to the next chord.
See this other post to learn the related chords in Major and minor key signatures, also known as diatonic chords.
The charts below are reference tables. Use the row for the key you’re working in when you need it, then continue to the application examples.
Secondary Chords in Major Keys
| Key center | 5 of 2 chord | 5 of 3 chord | 5 of 4 chord | 5 of 5 chord | 5 of 6 chord | 5 of 7 chord |
|---|---|---|---|---|---|---|
| C Major | A Major | B Major | C Major | D Major | E Major | F# Major |
| D Major | B Major | C# Major | D Major | E Major | F# Major | G# Major |
| E Major | C# Major | D# Major | E Major | F# Major | G# Major | A# Major |
| F Major | D Major | E Major | F Major | G Major | A Major | B Major |
| G Major | E Major | F# Major | G Major | A Major | B Major | C# Major |
| A Major | F# Major | G# Major | A Major | B Major | C# Major | D# Major |
| B Major | G# Major | A# Major | B Major | C# Major | D# Major | F Major |
| Db Major | Bb Major | C Major | Db Major | Eb Major | F Major | G Major |
| Eb Major | C Major | D Major | Eb Major | F Major | G Major | A Major |
| Gb Major | Eb Major | F Major | Gb Major | Ab Major | Bb Major | C Major |
| Ab Major | F Major | G Major | Ab Major | Bb Major | C Major | D Major |
| Bb Major | G Major | A Major | Bb Major | C Major | D Major | E Major |
Secondary Chords in Minor Keys
| Key center | 5 of 2 chord | 5 of b3 chord | 5 of 4 chord | 5 of 5 chord | 5 of b6 chord | 5 of b7 chord |
|---|---|---|---|---|---|---|
| C minor | A Major | Bb Major | C Major | D Major | Eb Major | F Major |
| D minor | B Major | C Major | D Major | E Major | F Major | G Major |
| E minor | C# Major | D Major | E Major | F# Major | G Major | A Major |
| F minor | D Major | Eb Major | F Major | G Major | Ab Major | Bb Major |
| G minor | E Major | F Major | G Major | A Major | Bb Major | C Major |
| A minor | F# Major | G Major | A Major | B Major | C Major | D Major |
| B minor | G# Major | A Major | B Major | C# Major | D Major | E Major |
| Db minor | Bb Major | B Major | Db Major | Eb Major | E Major | G Major |
| Eb minor | C Major | Db Major | Eb Major | F Major | Gb Major | Ab Major |
| Gb minor | Eb Major | E Major | Gb Major | Ab Major | A Major | B Major |
| Ab minor | F Major | Gb Major | Ab Major | Bb Major | B Major | Db Major |
| Bb minor | G Major | Ab Major | Bb Major | C Major | Db Major | Eb Major |
Secondary Dominant Chords
Secondary dominants are often played as dominant 7 chords because the added b7 strengthens the resolution into the target chord.
For example, in C Major, D7 → G gives us 5 of 5 → 5. D7 is outside the diatonic chords of C Major, but its function is clear because it temporarily points toward G.

Alternate between D minor → G and D7 → G. Listen to how changing the 3rd of the D chord from F to F# changes its function and strengthens the movement into G.
We can also add chord tensions to secondary dominant chords, which we will cover in the application examples at the end.
If you want to be able to improvise over dominant chords, a good place to start is by learning how to play dominant arpeggios on guitar.
Related idea: secondary diminished chords
A diminished 7 chord can also create strong movement into a target chord when its root sits a half step below that target.
For example, B diminished 7 contains B, D, F, and Ab. Those notes also appear as the 3rd, 5th, b7, and b9 of G7(b9), so Bdim7 can create a similar pull into C Major without the G root.
You can use this idea by placing a diminished 7 chord a half step below the chord you’re approaching. For example, here’s the same progression from the previous section, except we replace the D 7 chord with an F# diminished 7 chord.

Application Examples
The examples below show how the same idea works in several harmonic settings. Start with Examples 1 through 3 and identify the target chord before you play. Then use the later examples to explore dominant extensions, diminished substitutions, and richer voicings.
The examples include a chord analysis above the staff to explain how each chord is functioning within the progression.
As you play each example, listen to the secondary chord and the chord that follows it as one connected movement. Notice how the secondary chord creates tension and how the target chord releases or redirects that tension.
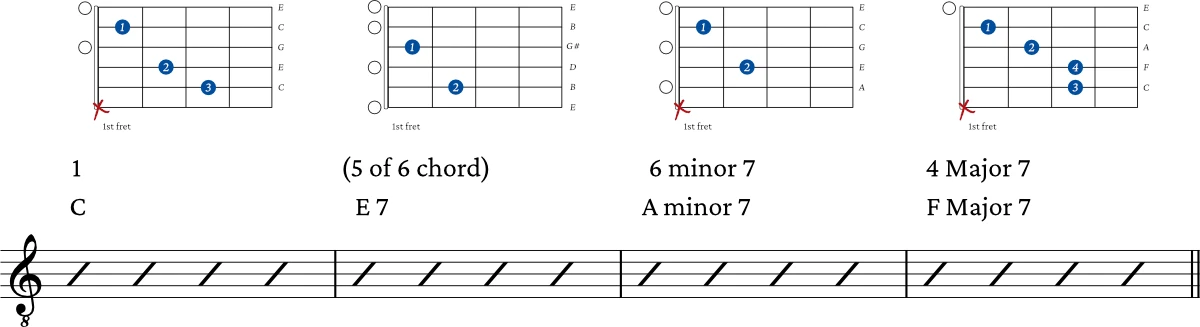
Example 1: Key of C Major
The chords for the first example are C Major, E 7, A minor 7, and F Major 7. You can click on the chords with links to learn other ways of playing that chord.
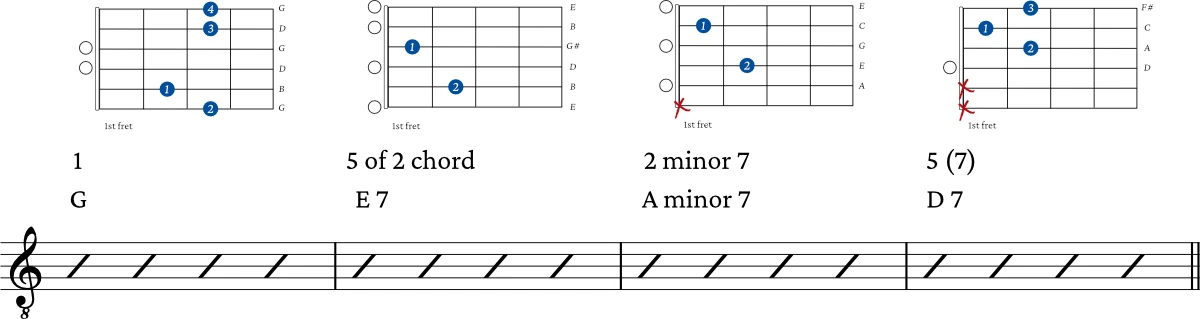
Example 2: Key of G Major
The following chords are G Major, E 7, A minor 7, and D 7.
Included with Pro
Take this lesson a little further.
This bonus section is included with Pro Membership. Pro also gives you the full Guitar Roadmap to keep your learning in order, plus direct access to me when something isn’t clicking.
Already a member?
Log in →
Included in Pro Membership ✨
The one thing to remember
A secondary dominant temporarily treats a chord inside the key as a destination by placing its own 5 chord or dominant 7 chord before it.
Think in two steps: choose the target chord, then find its 5. Once you can hear that tension and resolution, you can begin using secondary dominants deliberately in progressions, arrangements, and compositions.
Before continuing
You’re ready to continue when you can choose a non-tonic chord in a familiar progression, find its 5 chord or dominant 7 chord, place that chord before the target, and explain the new relationship using 5 of ___ notation while hearing the stronger resolution.
Next: Continue in the Mastery Roadmap to keep developing advanced chord function and harmony.
📘 Get the free Practice Blueprint: Build better habits and make your progress more consistent.
Download the free guide →