
A Dominant 7 arpeggio takes the notes of a Dominant 7 chord and plays them one at a time.
The shape is closely related to the Major 7 arpeggio from the previous lesson, but the 7th is lowered by one fret. That b7 gives the Dominant 7 chord its distinct sound.
In this lesson, you’ll learn the Dominant 7 formula, movable arpeggio shapes, and ways to use those chord tones in your improvising.
Mastery Roadmap Focus · View Roadmap →
Start with one Dominant 7 arpeggio shape and identify the 1, 3, 5, and b7 as you play. Compare it with the Major 7 arpeggio from the previous lesson, then use the Dominant 7 chord tones to create a short phrase.
Understanding Dominant 7 Arpeggios
A Dominant 7 arpeggio contains the same four notes as a Dominant 7 chord: 1, 3, 5, and b7.
For example, C 7 contains C, E, G, and Bb. Play those notes individually and you have a C Dominant 7 arpeggio.
These chord tones can also be understood in relation to the Mixolydian scale.
Here is the formula for Dominant 7 chords below.

Compare C Major 7 and C 7 arpeggios. Both contain C, E, and G. The only change is B moving down to Bb. Play both slowly and listen to how that one note changes the sound.
Now that you know what notes belong to the Dominant 7 chord structure, let’s look at how to read the chord charts.
How to read the chord charts
For the chord charts below:
- The top horizontal line of the chord chart represents the high E string and the bottom horizontal line represents the low E string.
- The vertical lines separate each fret.
- The green dots represent the root note.
You can check this link for more on how to read guitar notation symbols.
The shapes below give you several ways to find Dominant 7 chord tones across the fretboard. Start with one shape that feels comfortable, then use the others to expand into neighboring areas of the neck.
Dominant 7 arpeggio shape 1
Here is the first shape with the root note starting on the 6th string. You can use any root note to play these examples but we will cover application examples later in this lesson.
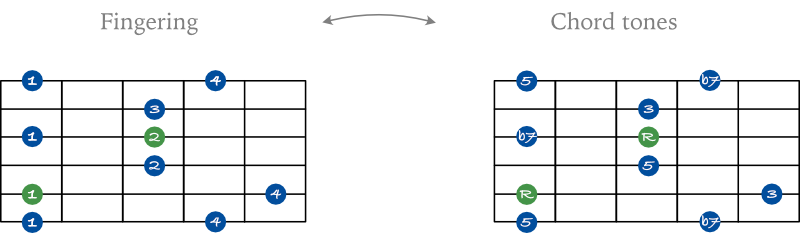
For the following charts, the left side shows you the suggested fingering for an arpeggio and the right side shows you what chord tones you are playing.
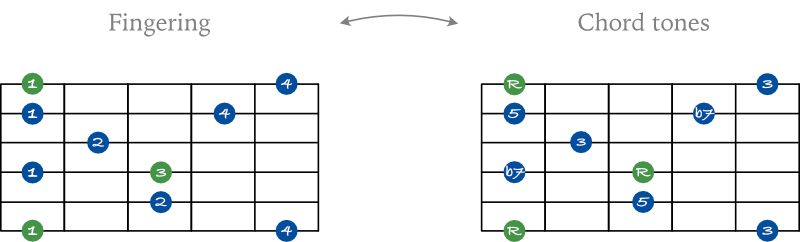
Play Shape 1 slowly and say the chord tones as you go: 1, 3, 5, b7. Then play it descending and keep track of the root notes inside the shape. Move the same arpeggio shape to one other root, name the new Dominant 7 chord, and keep track of the same 1, 3, 5, b7 relationships.
Dominant 7 arpeggio shape 2
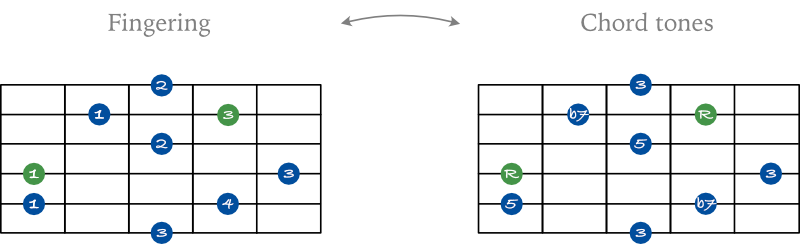
Dominant 7 arpeggio shape 3
Now, here is a Dominant 7 arpeggio shape with the root note starting on the 5th string.
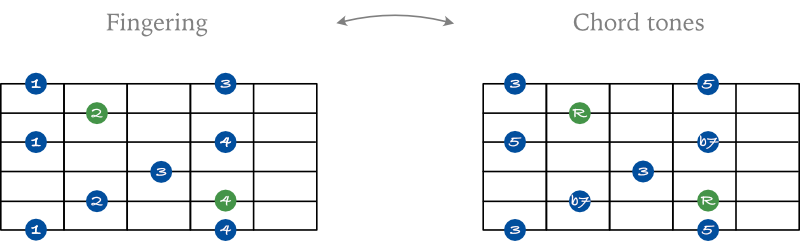
Dominant 7 arpeggio shape 4
Here is another way you can play the arpeggio with the root note on the 5th string.
Dominant 7 arpeggio shape 5
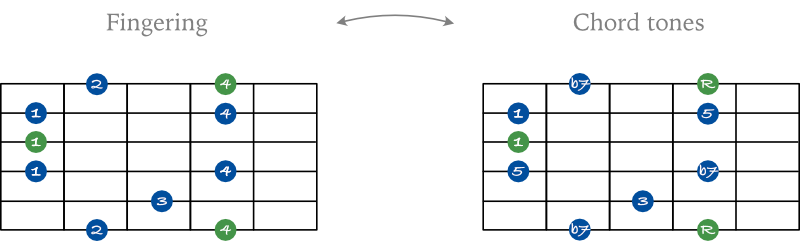
Once your first shape is comfortable, choose one neighboring shape and compare where the same 1, 3, 5, and b7 chord tones appear.
The diagrams below show how the Dominant 7 arpeggio shapes connect across the fretboard in several keys. Use them as maps when you want to move beyond one position.
All arpeggio shapes on the fretboard
To help you connect all the shapes we learned, here are all the arpeggio shapes on the fretboard using a C 7 chord arpeggio.
C 7 arpeggios
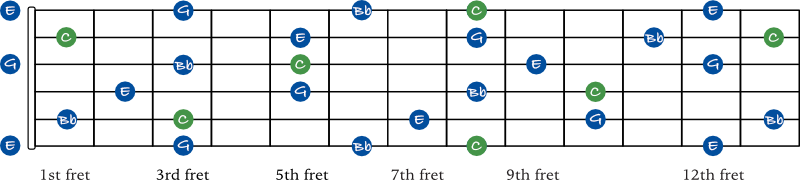
Find your original C 7 arpeggio shape on the full fretboard map. Then locate one neighboring position and create a short line that moves from the first shape into the second.
E 7 arpeggios
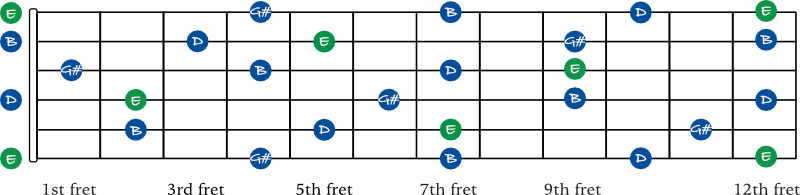
Here are all the arpeggio shapes on the fretboard using an E 7 chord arpeggio.
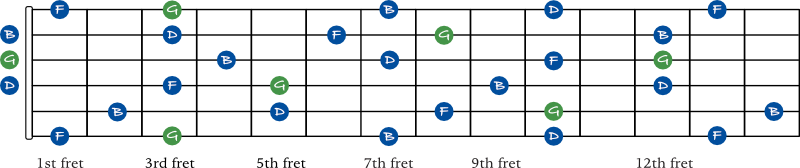
G 7 arpeggios
Here are all the arpeggio shapes on the fretboard using a G 7 chord arpeggio.
Dominant 7 arpeggio application examples
Now, we’ll look at some application examples of using arpeggios over a C 7 chord. You can listen to each example below the notation with tabs.
The examples below show how Dominant 7 chord tones can become musical phrases instead of simply running an arpeggio shape up and down.
Application example 1
This first example uses an ascending four-note pattern with only the C 7 chord tones: C, E, G, and Bb.

Application example 2
For example 2, we have a descending arpeggio pattern that skips one note after every chord tone.

Play over a C 7 chord or backing track using only C, E, G, and Bb. Change the rhythm, repeat short ideas, and leave space instead of continuously running the arpeggio.
Application example 3
Once the Dominant 7 chord tones are clear, you can connect them with nearby scale notes. The arpeggio tones still help the phrase clearly outline the C7 chord.

You can also think of the beginning as a C 9 chord arpeggio which extends past the basic 7th chord structure.
Create a short phrase that begins and ends on Dominant 7 arpeggio tones, then connect them with one or two nearby scale notes.
The final examples show how Dominant 7 arpeggio tones can be combined with chromatic notes and blues-scale ideas for different melodic sounds.
Application example 4
Example 4 combines an arpeggio note-skipping pattern with other scale and chromatic notes.

Application example 5
This last example blends the Dominant arpeggio with a C blues scale in measure 1.

Put on a Dominant 7 chord or simple backing track. Create two short phrases with one arpeggio shape. First use only 1, 3, 5, and b7. Then keep those chord tones as your main targets while adding one or two nearby scale notes.
Wrapping up
Dominant 7 arpeggios give you the 1, 3, 5, and b7 of the chord as individual notes you can use melodically.
Start with one movable shape, keep track of the chord tones inside it, and notice how lowering the 7th distinguishes this sound from the Major 7 arpeggio.
From there, the additional shapes, fretboard maps, and later examples give you more ways to connect Dominant 7 chord tones with scale, chromatic, and blues ideas.
Before continuing
You’re ready to continue when you can play one Dominant 7 arpeggio from the formula 1, 3, 5, b7, move the shape to another root, hear the difference from a Major 7 arpeggio, and use the chord tones to create a short phrase over a Dominant 7 chord.
Next: Continue in the Mastery Roadmap to keep developing arpeggios and chord-tone application.
📘 Get the free Practice Blueprint: Build better habits and make your progress more consistent. Download the free guide →