
Learning a scale is only the first step. The next challenge is knowing how to practice it so the notes become easier to find, move between, and use musically.
In this lesson, we’ll look at several ways to practice scales, including connecting shapes, using patterns and intervals, playing with a metronome, applying scales over chord progressions, and learning ideas by ear.
- Learning and connecting scale shapes
- Practicing scale patterns
- Practicing scale intervals
- Practicing scale arpeggios
- Playing scales over chord progressions
- Playing scales over key changes
- Practice scales with a metronome
- Transcribing
Use these ideas to build more variety into your scale practice and move beyond simply playing the notes straight up and down.
Skill Builders Roadmap Focus · View Roadmap →
Choose one scale you already know and practice it in three ways: move it through more than one fretboard position, change the note order with a pattern or interval exercise, and use it musically over chords or a backing track.
1. Learning and connecting scale shapes
Scale shapes give you a practical map of where the notes sit on the fretboard. Once one position feels familiar, the next step is connecting it to the positions around it so you can move more freely across the neck.
Playing scale vertically
Since the same notes are repeated throughout the fretboard, we can learn the scale by dividing it into different sections, also known as a “scale shape” where we can play 2 or 3 notes per string. We can think of this as playing the scale vertically because we play the notes from the lowest to highest strings and vice versa.
For example, once you learn the 5 Major scale shapes, you can then apply the shapes to any key. If you master the shapes in one key, then it’s simply a matter of playing the same shapes on different starting points for other keys.
I recommend learning the C Major scale first because it’s the key signature that doesn’t have any sharp or flat notes.
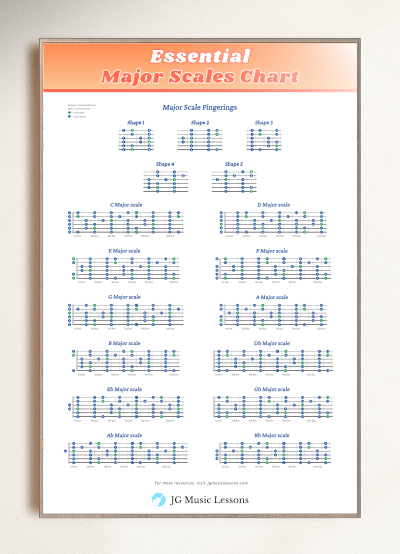
How to read the scale charts
For the charts below:
- The lowest horizontal line represents the thickest string (Low E). The top horizontal line represents the thinnest string (high E).
- The green circles represent the root note of the scale and the blue notes are every scale note in between.
- The numbers inside the circles represent the suggested fingering to use on your fretting hand.
If needed, review how to read guitar notation symbols.
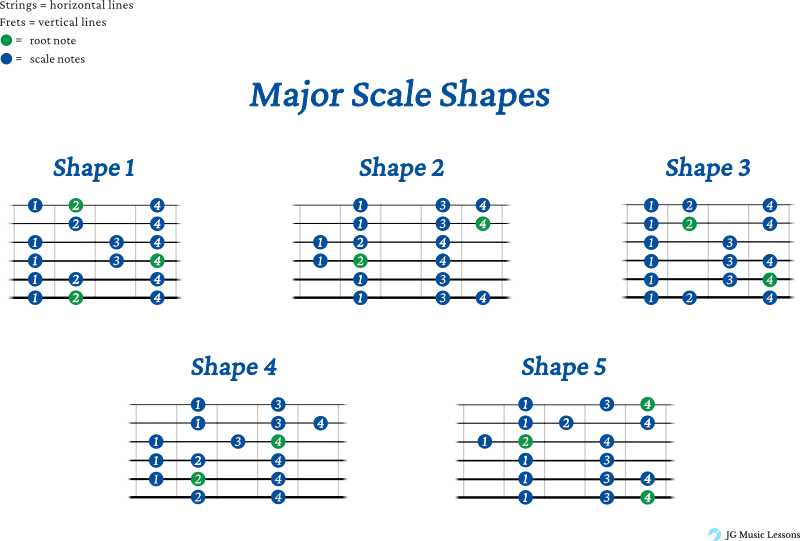
Start with one scale shape and practice it until you can recognize the pattern without constantly checking the chart. Then connect it to the position directly before or after it.
You can apply this concept of memorizing shapes for any scale, whether it’s the minor scale, pentatonic or blues scale. Working on memorizing and reviewing scales is a great way to start a practice session.
Connecting scale shapes
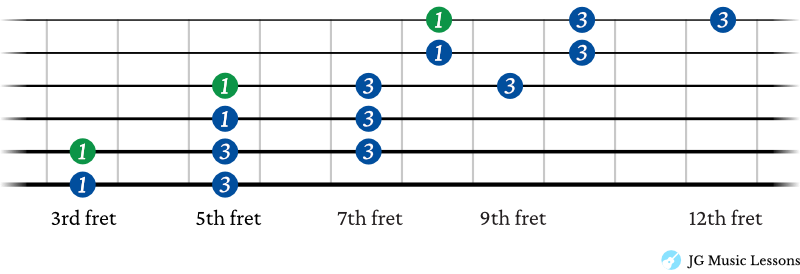
To get more comfortable using a scale, the next step is to learn to play it between positions throughout the fretboard. You might have to work out new fingerings that are more comfortable to switch between scale shapes. However, if you are familiar with each scale shape, then connecting the notes will be much easier.
For example, here is one way to connect the notes of a pentatonic scale across several shapes.
Playing scales horizontally
Another less conventional way to practice a scale is to play the notes horizontally across one string. Although you don’t typically play scales this way, there are times when you simply need to stay on the same string to move across the fretboard. This is especially the case when you’re ascending on the 1st string.
For example, this is what the notes of the E minor scale would look like horizontally across the 1st string below. You can also think of this as a G Major scale starting on the 6th degree.
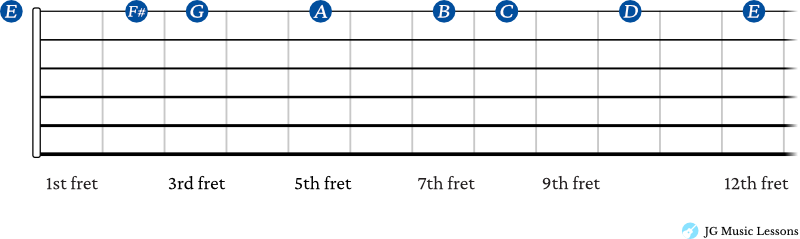
Try this: Choose one string and locate the notes of a scale you know across that string. Then compare those notes with the scale shapes around them. This helps connect the patterns you see vertically with the notes that continue horizontally across the neck.
2. Practicing scale patterns
Scale patterns change the order of the notes so your fingers and ears stop relying on the same ascending and descending sequence.
Start with one pattern below and apply it to a scale shape you already know. Once it feels comfortable, try the same pattern descending or move it to another key.
If you want more ideas for preparing your hands and combining technique with musical concepts, see these guitar warm up exercises.
Here are some examples of scale patterns that you can practice.
3 consecutive scale notes pattern
The numbers below represent the degrees of the scale. This pattern goes like this:
1, 2, 3, then, 2, 3, 4, then, 3, 4, 5, etc…
In C Major, this would be the notes: C, D, E, then, D, E, F, then, E, F, G, etc…
Try playing the 3 consecutive note scale pattern in C Major below.
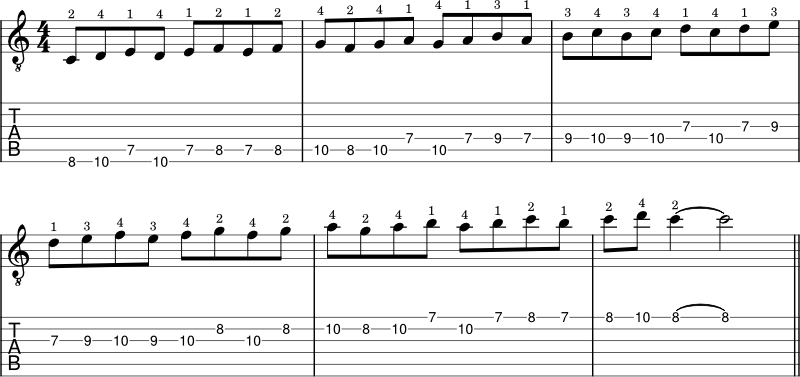
This example shows an ascending 3 note pattern but you can also try this in descending order.
4 consecutive notes pattern
The 4 consecutive notes pattern in scale degrees would be:
1, 2, 3, 4, then, 2, 3, 4, 5, then, 3, 4, 5, 6, etc…
In C Major, this would be the notes: C, D, E, F, then, D, E, F, G, then, E, F, G, A, etc…
Try playing the 4 consecutive note scale pattern in C Major below.
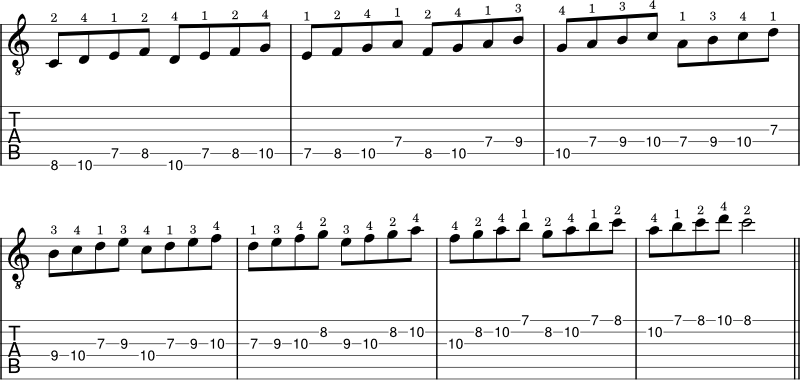
Try this: Choose either the 3-note or 4-note pattern and play it through one familiar scale position. Then change one part of it, such as the direction, rhythm, or starting note, and listen to how the same scale begins to sound different.
After learning these previous patterns, you can also try practicing consecutive 5 or 6 scale note patterns.
3. Practicing scale intervals
Practicing scales in intervals helps you hear relationships between notes instead of only hearing the scale in order. We’ll use C Major for the examples below, but the same idea can be applied to other scales and keys.
Scale in interval of thirds
Using scale degree numbers, the pattern for intervals of thirds would be:
1, 3, then, 2, 4, then, 3, 5, etc…
In C Major, this would be the notes: C, E, then, D, F, then, E, G, etc…
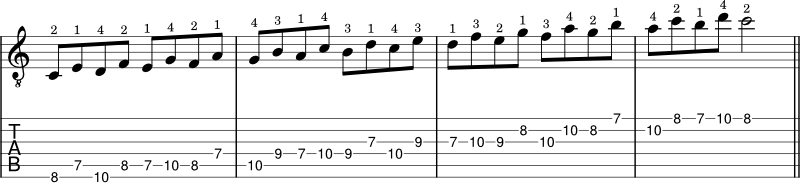
Start with thirds until the idea is clear, then use the later examples to explore wider intervals and different sounds.
For the previous example, we are ascending on each scale note.
However, you could also try these variations:
- Descending order of third intervals like this: 3, 1, then, 4, 2, then, 5, 3, etc…
- Alternate on each scale note (ascending, descending order) like this: 1, 3, then 4, 2, then 3, 5, etc…
- Alternating variation (descending, ascending order) like this: 3, 1, then, 2, 4, then, 5, 3, etc…
Scale in interval of 4ths
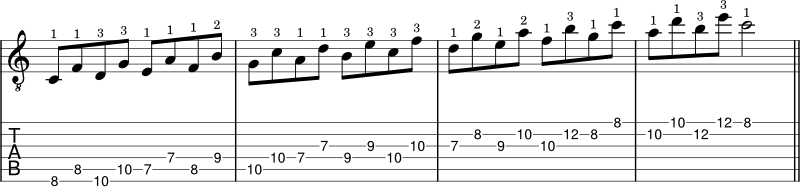
Again, you could explore all the variations I mentioned previously (descending and alternating orders) with all of these different scale intervals to get the most out of these exercises.
Scale in interval of 5ths
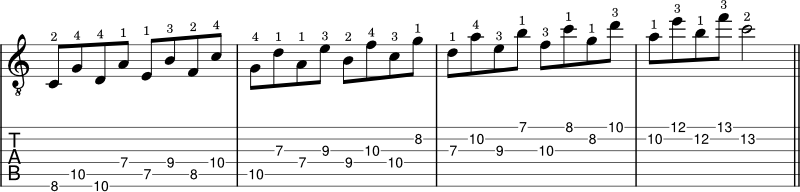
Scale in interval of 6ths
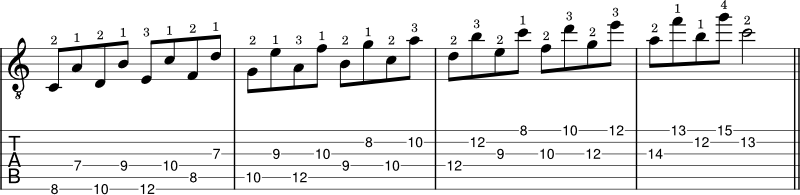
Scale in interval of 7ths
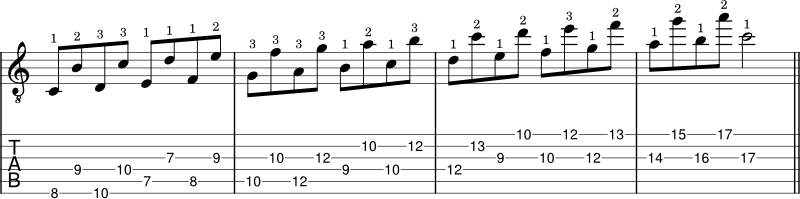
Octave intervals
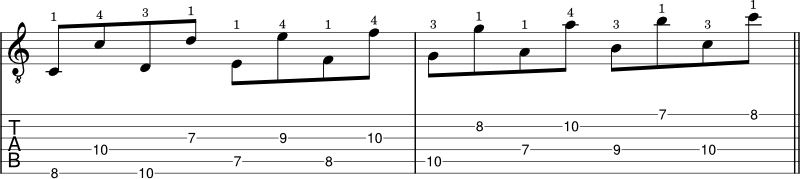
Scale in interval of 10ths
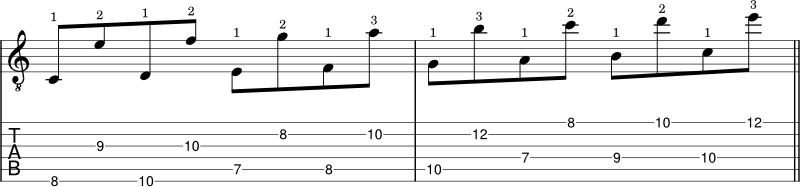
4. Practicing scale arpeggios
Arpeggios give you another way to reorganize scale notes by outlining the chords that come from the scale. In C Major, for example, you can build triads by taking one scale note, skipping the next, and repeating that pattern.
Using the C Major scale you naturally get the following triad chords. These are also known as diatonic chords, which simply means the related chords coming from one scale.
- C Major – C, E, G
- D minor – D, F, A
- E minor – E, G, B
- F Major – F, A, C
- G Major – G, B, D
- A minor – A, C, E
- B diminished – B, D, F
You can review these lessons to learn how to play Major triads or minor triads on guitar. The following example will show you how to practice arpeggios on guitar using diatonic triad chords in C Major.
Triad chord arpeggios
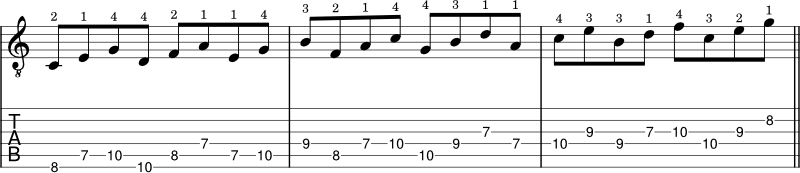
Keep in mind that these examples show the scale in one position but I encourage you to practice these scale concepts throughout the fretboard.
7th chord arpeggios
We can take this one step further and add another scale note to the triads. If we skip one more note in the scale, we get what are called 7th chords. Here are the diatonic 7th chords in C Major.
- C Major 7 – C, E, G, B
- D minor 7 – D, F, A, C
- E minor 7 – E, G, B, D
- F Major 7 – F, A, C, E
- G 7 – G, B, D, F
- A minor 7 – A, C, E, G
- B half diminished – B, D, F, A
Here is the exercise for diatonic 7th chords in C Major below.
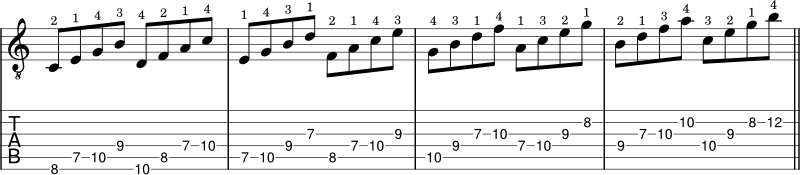
Again, you could also practice these triads and arpeggios in descending and alternating orders. If needed, check out how to play Major 7 arpeggios, Dominant 7 arpeggios, minor 7 arpeggios or half diminished chords on guitar.
5. Playing scales over chord progressions
This is where scale practice starts turning into music. Choose a scale and play it over a related chord or chord progression so you can hear how the notes work in context.
Start by creating short phrases instead of continuously running the scale. Play an idea, leave some space, listen to the chords underneath, then answer it with another phrase.
A great way to practice this is to record some chords that you can then playback in a program like Garageband or a more in depth program like Logic Pro X.
Try this: Use a simple chord progression or backing track and improvise for one minute with a scale you know. Focus on short phrases, steady timing, and recovering your place if an idea doesn’t come out the way you expected.
You can also take a phrase or melody and try applying the idea to a chord progression. Challenge yourself to play the same riff or melody in different areas of the guitar. Also experiment with changing different notes and rhythms to make variations in your musical phrases.
6. Playing scales over key changes
Another way to strengthen your fretboard knowledge is to move the same scale idea through different keys. This tests whether you understand the root notes and movable shapes rather than only remembering one fretboard location.
Here is an example of practicing scales over a cycle of chords. After every scale, we’ll shift the starting point up an interval of a fourth.
Scale over a cycle of 4ths

Start with two or three keys and keep the same scale shape or musical idea as you transpose it. Add more keys as the movement becomes easier.
7. Practice scales with a metronome
Developing speed and rhythm
Here is a suggested exercise for how to practice guitar scales using a metronome (you can use this free metronome on our site).
- Start at a slow and comfortable tempo to practice a scale in one position of a scale that you want to learn.
- Make sure you can play all the notes from the lowest to highest string without any mistakes and with a clear tone.
- Increase the tempo by 5 bpm (beats per minute) and try the scale again.
- Keep increasing the tempo until it you find that your technique or tone isn’t keeping up with the tempo. At this point, pull the tempo back to find a sweet spot that is just challenging enough for effective practice.
Increase the tempo only while the notes stay clear and the rhythm stays even. When either one starts to fall apart, bring the tempo back slightly and work there.
Changing beat numbers on the click
When using a metronome to practice, it is very common to hear each click as one beat. Instead of hearing the click as (1, 2, 3, 4) you can set it at half the speed and think of the click as beats 1 and 3 which repeat. You can also do the same by thinking of the click as beats 2 and 4 to shift the perspective of the timing.
By spacing out the sound of the click, you challenge your ability to keep consistent time. This can also simulate the gaps that occur when playing in different situations, whether you’re practicing over a backing track or playing in a live setting.
Changing note rhythms
For example, start with two scale notes for every click. Then try other groupings such as three, four, or six notes per click.
Adjust the tempo to something that is just comfortable or just challenging enough. The point is to be able to hear and play the scale using different rhythms to use it more flexibility when playing melodies or for improvisation.
If possible, I suggest practicing this rhythm exercise with a backing track for a more musical application of this concept. It can make your practice more engaging and fun to work on different rhythmic ideas on the guitar.
8. Transcribing
Transcribing means learning music by listening and finding the notes on your instrument. Start with something small, such as a riff or short melody, and work out the notes one phrase at a time.
Once you’ve found the phrase, look at which scale notes are being used and how the rhythm shapes the idea. Then try changing one part of the phrase and using it in your own playing.
For an example, see these 7 jazz and blues licks over a dominant 7 chord.
For more on this, you might want to check out this post on how to develop ear training to play what you hear.
Included in Pro Membership ✨
Put it into a short scale practice routine
Choose one scale and spend a few minutes on each of these:
- Navigate: Play one shape and connect it to a neighboring position.
- Vary: Use one scale pattern, interval exercise, or arpeggio idea.
- Make music: Play short phrases over a chord progression or backing track.
Keep the same scale for the whole session so you’re practicing several ways of using the same set of notes rather than constantly switching material.
Wrapping up
Knowing a scale shape is useful, but the bigger goal is being able to move the notes around, change their order, hear them against chords, and turn them into musical ideas.
Choose one scale and practice it from several angles instead of always adding another shape or another scale. Connect positions, use a pattern or interval exercise, and finish by making music with the notes.
As those skills become more comfortable, rotate in other exercises from this lesson and apply the same approach to different scales and keys.
For more ideas on musical application, see these 9 tips to get better at improvising on guitar.
Before continuing
You’re ready to continue when you can take one familiar scale, connect it across more than one fretboard position, practice it with a pattern or interval exercise, and use it to create short phrases over a chord progression or backing track.
Next: Return to the Skill Builders Roadmap to review Module 3 and check your scale application and fretboard navigation before moving on.
📘 Get the free Practice Blueprint: Build better habits and make your progress more consistent. Download the free guide →