

Getting better at improvising is less about finding more notes and more about learning how to shape the notes you already know into musical ideas.
In this lesson, we’ll look at nine ways to develop your improvisation, including rhythm, melody, repetition, chord awareness, song form, and shaping a solo over time.
Skill Builders Roadmap Focus · View Roadmap →
Use one familiar scale over a simple chord progression. Create one short phrase, then develop it by changing the rhythm, repeating part of it, leaving space, or changing the ending. Your goal is to make a few notes sound connected rather than constantly searching for new ones.
1. Being flexible with scales
Scale shapes give you the notes to work with, but improvisation asks you to use those notes flexibly. Instead of always moving straight up and down a shape, change the order, direction, rhythm, and position of the notes.
Use a scale you already know well enough that you can focus on the phrase rather than finding the pattern.
Learn scale patterns
Patterns can help break the habit of always playing a scale in order. Take a small note sequence and move it through the scale, then change the rhythm or direction so it begins to sound like a musical idea rather than an exercise.
One way of playing a scale pattern is using sequences of consecutive notes. For example, a 3 consecutive note sequence using the E minor scale would be:
E, F#, G, then,
F#, G, A, then,
G, A, B, etc…
Here is an example of this 3 note E minor scale pattern over an E minor 7 chord and a D Major chord.
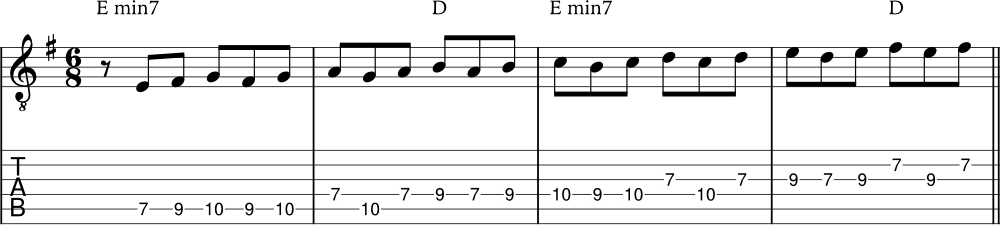
You can try ascending sequences (low to high notes), descending (high to low notes) or even alternating between the two.
Here is another example of a 4 note E minor pentatonic scale pattern over the same chords as the previous example.
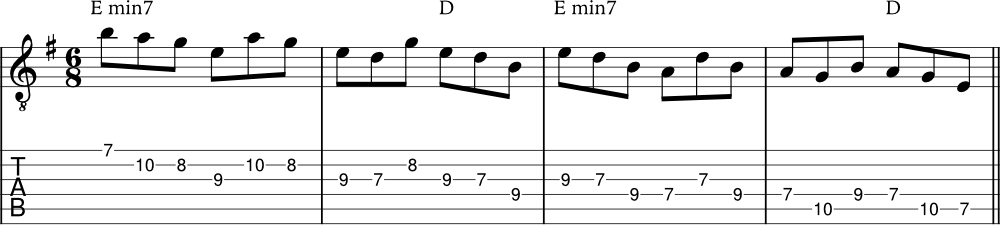
Using intervals within a scale
Another concept you can explore in improvisation is the use of intervals within a scale. An interval is a distance between 2 notes in a scale. Every interval has a distinct sound that you might want to use instead of playing a linear scale to improvise.
Here is a simple way to think about intervals within a scale:
- 2nd: move to the next scale note (C to D)
- 3rd: skip one scale note (C to E)
- 4th: skip two scale notes (C to F)
- 5th: skip three scale notes (C to G)
- 6th: skip four scale notes (C to A)
- 7th: skip five scale notes (C to B)
Each interval has its own sound, which gives you another way to break out of simply playing scale notes in order. For example, 3rds and 6ths can create more melodic lines and are also useful for harmonizing melodies.
Here is an example using descending 6ths from the E minor scale.
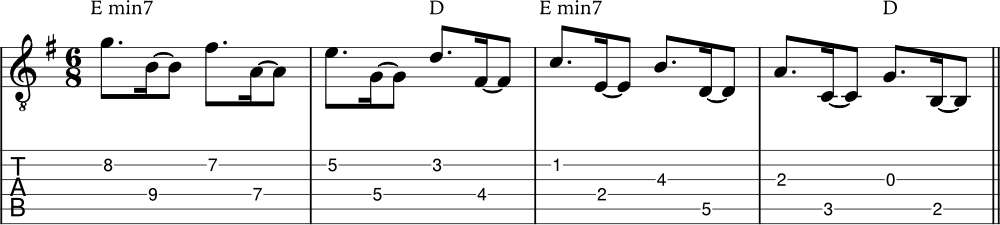
I go in more detail on intervals in this post about how to practice scales on the guitar.
2. Explore rhythmic ideas
Rhythm can completely change a phrase even when the notes stay the same. Try changing note lengths, adding rests, or starting the same idea on a different part of the beat.
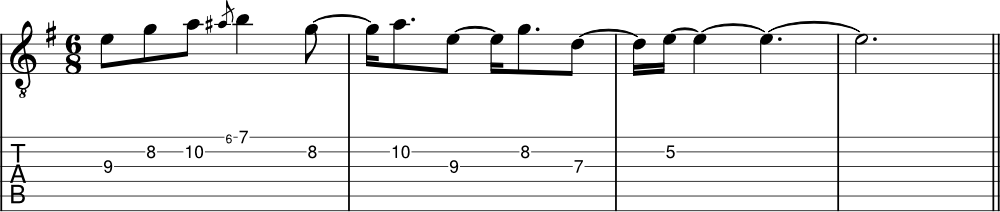
You can also try starting your phrases on different parts of the beat. Here is a similar series of notes as the previous example except we start the phrase later in the 1st measure (beat 4 in 6/8 time).
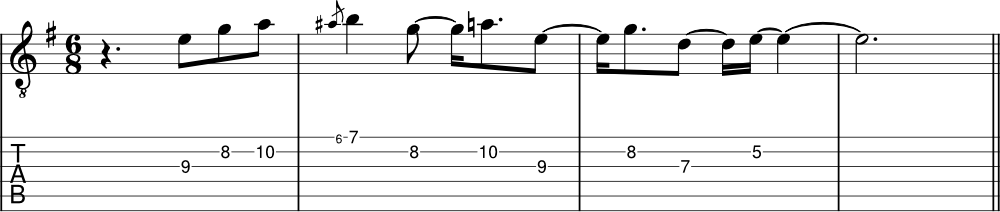
Try this: Create a phrase of three to five notes. Play it once, then repeat the same notes with a different rhythm. Listen to how much the character of the phrase changes without adding any new notes.
You can try playing a phrase on different parts of a beat and see which one you like best. Working out this kind of exercise during your practice time will make you more flexible with rhythm when improvising.
3. Learn and create melodies
A strong improvisation usually contains ideas you can remember. Think in short melodies rather than long streams of scale notes. You can expand your musical vocabulary by learning these 7 jazz and blues licks over a dominant 7 chord.
One useful exercise is to sing or hum a short phrase first, then find it on the guitar. This helps connect your ear to the instrument instead of letting your fingers choose every note automatically.
4. Soloing over related chords
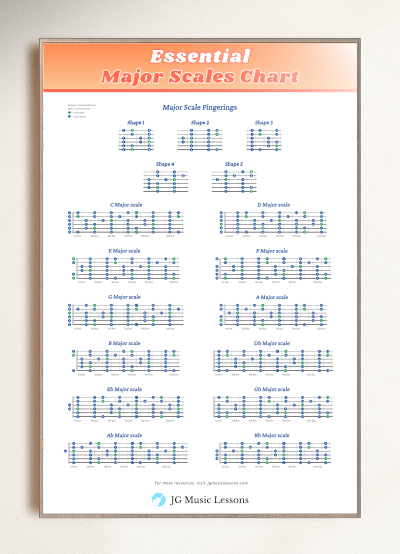
Understanding the key center helps you know which scale gives you a useful starting set of notes over a progression. When several chords come from the same key, one parent scale can often connect them.
Diatonic chords (related chords) chart
When several chords are related to one scale, this is referred to as diatonic chords. Using the notes within one Major scale, we can build the following chord qualities on each scale degree.
| Scale degree | Chord quality | 7th chords |
| 1 | Major | Major 7 |
| 2 | minor | minor 7 |
| 3 | minor | minor 7 |
| 4 | Major | Major 7 |
| 5 | Major | Dominant 7 |
| 6 | minor | minor 7 |
| 7 | Diminished | Half diminished |
Using this concept we can understand the connection between related chords. For example, if we were to apply this to a G Major scale, we get the following diatonic 7th chords: G Major 7, A minor 7, B minor 7, C Major 7, D 7, E minor 7, and F# half diminished. This is what these chords sound like:
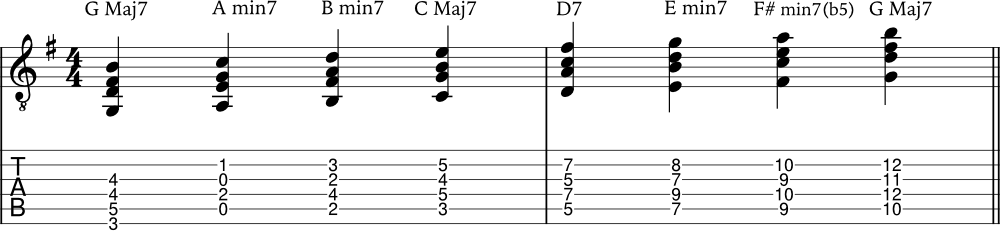
Even if you change the order of the chords, you’ll see that using one parent scale works over all the chords.
See how to play half diminished chords (aka minor 7 b5 chords) here if you don’t know them already.
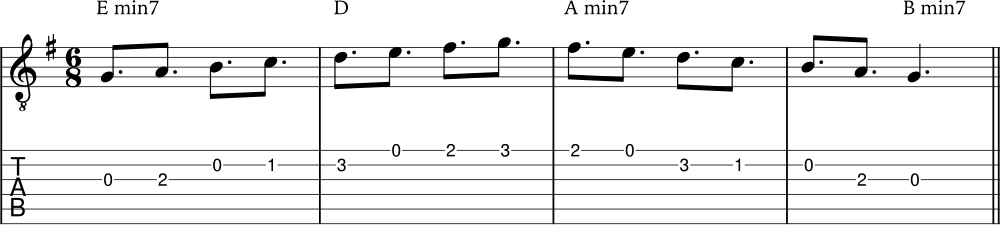
In this example, I’m using a G Major scale over the following the chords: E minor 7, D Major, A minor 7, and B minor 7.
Knowing how chords are related will also help you play and compose with modes to create unique sounds and emotions.
5. Create phrase sequences
A phrase sequence starts with one musical idea and develops it through repetition or variation. This gives the listener something recognizable to follow and helps your solo sound connected.
The variation can be small. Keep the rhythm and change a few notes, keep the notes and change the rhythm, or repeat the beginning and give the phrase a different ending.
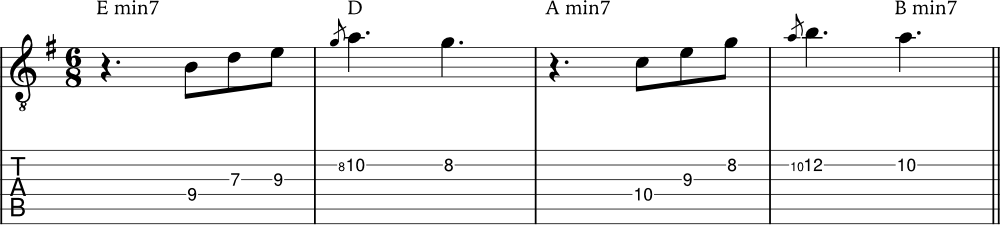
Try this: Create one short phrase over a simple progression. Repeat it once, then play it a third time with one change. Keep enough of the original idea that you can still hear the connection.
You think of a sequence as a short melody or series of notes that are repeated within a chord progression. Most popular songs use this element of repetition to help the listener remember a piece of music. Experiment with using sequences when improvising and see what works best within the musical context.
6. Know the song form
Improvising becomes easier when you know where you are in the music. Learn the chord progression and the length of each section so your attention can shift from remembering the form to creating phrases over it.
The melody is another useful guide. You can borrow its rhythm, repeat a small part of it, or use it as the starting point for a variation.
7. Transcribing
Transcribing means learning musical ideas by listening. Start with a short phrase from a solo or melody you like and find the notes on your guitar.
Once you’ve learned it, listen for the rhythm, repetition, and note choices that make the phrase work. Then change one part of it and try using the idea in your own improvisation.
8. Outlining chords
Another way to make a solo connect more clearly to the harmony is to emphasize notes that belong to the chord underneath you.
The F and Bb example below gives you a preview of this idea using triad notes. We’ll develop this approach more directly through chord tones as you continue through the module.
The following example outlines this simple chord progression: F, Bb, F, Bb.
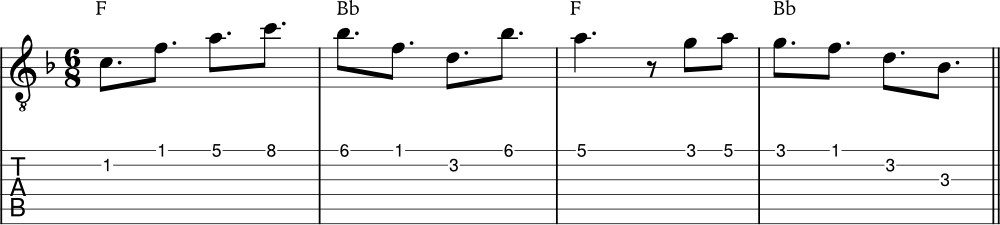
Also, experiment with different rhythms between triad notes when outlining chords.
Start by challenging yourself to only play the triad notes in one chord but later you can mix it along with other related scale notes.
It’s a good challenge to take a chord progression or a whole song form to practice outlining chords. Although it takes time to work out the right notes over chords, you’ll soon notice the difference it makes to give depth to your improvisation.
You can also apply this concept to 7th chords. For example, see how to play Major 7 arpeggios, Dominant 7 arpeggios, or minor 7 arpeggios on guitar.
9. Telling a story
A solo can develop over time instead of giving every idea the same intensity. You might begin with fewer notes and more space, gradually add rhythm or range, then bring the energy back down at the end.
The important part is that each phrase responds in some way to what came before it.
For example, you could start with sparse notes and build up to faster and more complex rhythms. Or you can also start with a lower range of notes and then you end at a high range of notes for the climax of the solo.
Another thing you can do is to start with notes that fit the chord progression but gradually build up to using more dissonant notes to create good tension in your solo. Using dynamics (how loud and soft you play notes) also plays a big part in how you can express a flow of ideas to tell a story.
After playing a musical phrase, try to think about what would be the most complimentary thing to continue playing. Thinking of your solo as a whole can make your note selections more intentional and appealing for the listener to follow along.
Try this: Improvise for three short rounds through the same progression. Keep the first round simple, develop one idea in the second, and let the third feel like an ending.
Wrapping up
Better improvisation often comes from developing a small idea rather than constantly adding more notes.
Start with one phrase. Change its rhythm, repeat part of it, leave some space, or give it a different ending. As you listen to the chords and song form underneath you, those small choices begin to connect into a more complete solo.
Chord tones are another important part of that process because they help your phrases connect more clearly to the harmony underneath them.
Before continuing
You’re ready to continue when you can create one short phrase over a simple progression, repeat it, make at least one clear variation, and use rhythm or space to keep the ideas connected while continuing after small mistakes.
Next: Continue in the Skill Builders Roadmap to keep developing how your lead lines connect to the chords underneath them.
📘 Get the free Practice Blueprint: Build better habits and make your progress more consistent. Download the free guide →
Original image by Parker Coffman on Unsplash