
Travis picking is a fingerpicking method named after guitarist “Merle Travis”, who has influenced guitarists over the last decades, including Chet Atkins and Tommy Emmanuel. This fingerpicking style is characterized by a repeated bass pattern, while playing chords and melody at the same time.
In this lesson, we’ll cover how to play Travis picking patterns and take you through the steps to play in this style, starting from easy to more advanced levels including audio and tabs to help you along the way.
Grab your guitar, and let’s get started!
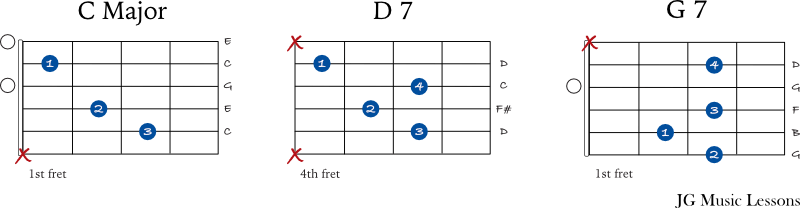
Chord charts for Travis picking examples
For the picking examples, we’ll be playing a basic progression use the chords C Major, D 7, and G 7. Try the following chords until you feel comfortable switching between them.
To quickly review for the picking symbols in the following examples:
- p = thumb (comes from “pulgar” in Spanish)
- i = pointer finger (comes from “indice” in Spanish)
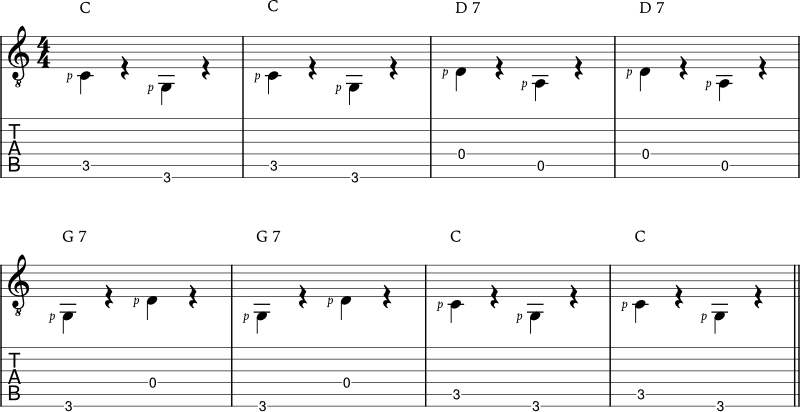
Pattern 1: Alternating bass notes
The first step to is get down is the bass notes for the chord progression. The bass notes generally alternate between the root and 5th of the chord. We are slightly muting the notes with the palm of the picking hand to give a shorted, thumpy sound.
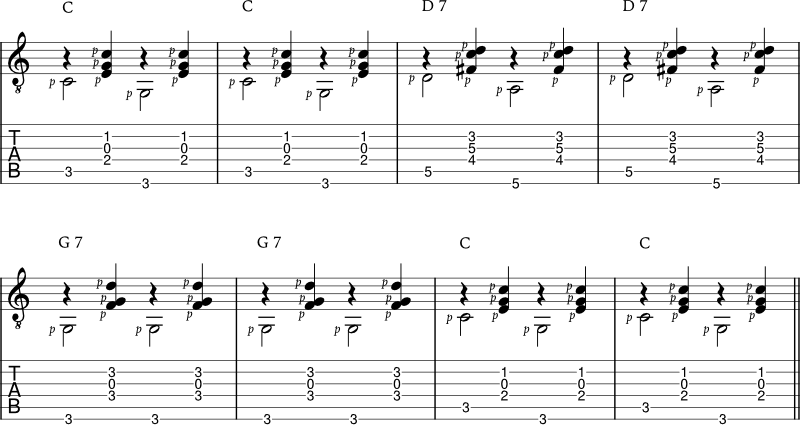
Pattern 2: Alternating bass notes and chords
For the next step, we are adding chords between the bass notes. You can hold each chord down and only move your finger on the lowest note to change the bass. We are keeping the bass line on the root note for the G 7 chord.
If you notice, the chords are also played with the thumb. Although you could use fingers 2, 3, and 4, you get a unique brushing effect with your thumb.
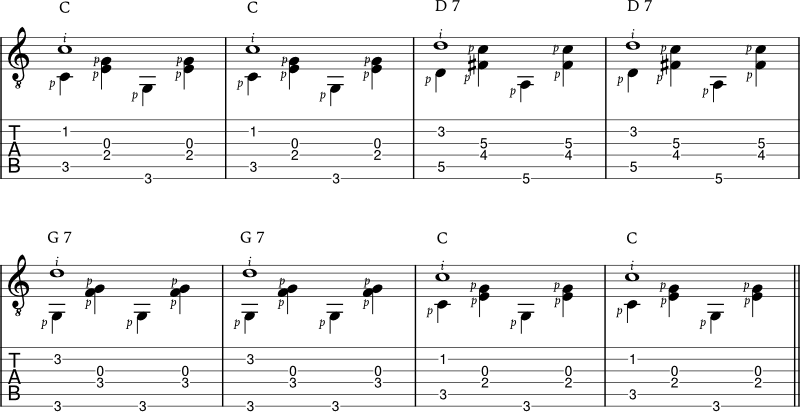
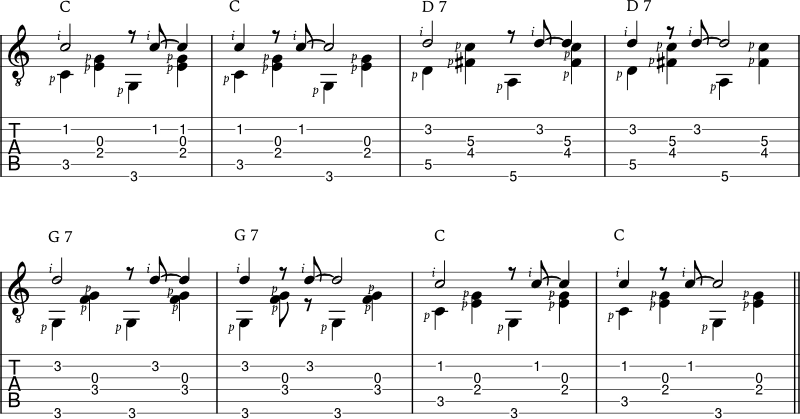
Pattern 3: Adding a melody note
For this pattern, we now include a single note melody at the top of the chords and bass notes. Make sure your palm is not muting the first string so that it can ring out over each chord.
We’ll use the pointer finger “i” to play the melody note on top.

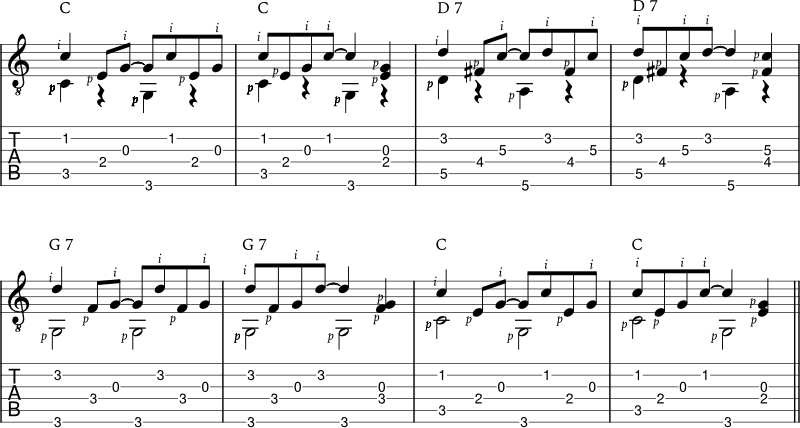
Pattern 4: Syncopated melody notes
At this point, you will hear the characteristic sound of Travis picking which includes syncopated melody notes above the chords and bass. This is were things get a bit more advanced but if you’ve followed along, you can get this pattern down with some practice.
If you are getting stuck on this pattern, take it as slow as needed until you can connect all the notes and get them to sound clear.
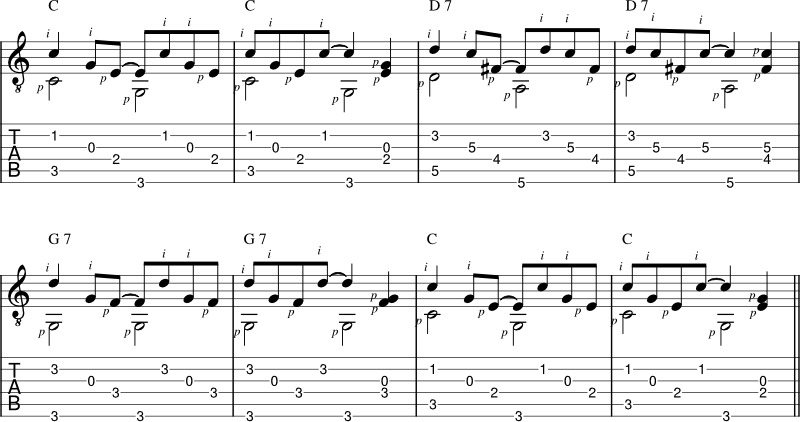
Pattern 5: Arpeggios
For this picking pattern, we are incorporate chord arpeggios. This means that we are individually breaking up the notes in a chord to create a rhythmic sequence.
Again, you could use your other fingers to play this pattern, but for this guide, we’re trying to stay stylistically close to this technique. If you notice in videos, it’s surprising to see that Merle Travis only picks with his thumb and pointer finger to play these seemingly complex picking patterns.
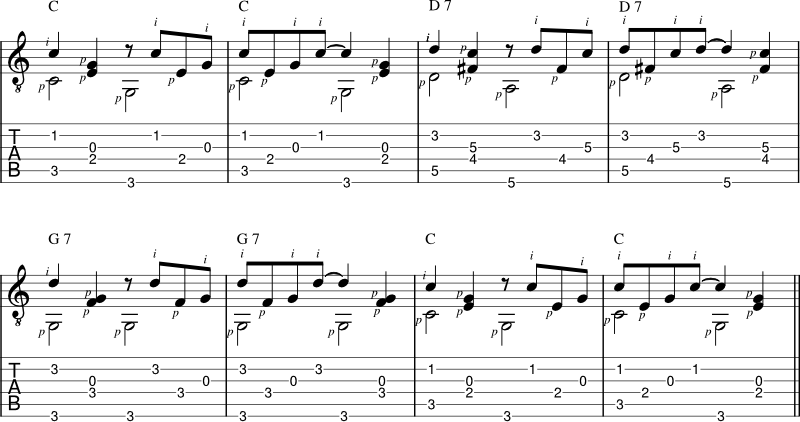
Pattern 6: Arpeggio variation
Here is another picking pattern using an arpeggio variation for each chord. Another thing I want to mention is how the rhythms repeat every two measures, which create a sequence in the music. For example, the rhythm in measures 1 and 3 are the same, measures 2 and 4 are the same, and so on.
Pattern 7: Rhythm variation
Here is one final rhythmic variation for a Travis picking style pattern.
Wrapping up
Travis picking is a unique style of playing that is definitely a fun challenge to learn. The key is to get the melody notes to sound clear while playing the bass and chords at the same time. Once you get this concept down, you can apply it over any chord to create nice sounding progressions.
I recommend slowing down these exercises as much as needed until you can play them cleanly and then gradually increase the tempo. By following the steps outlined in this lesson, it will be easier to play the more complex picking patterns.
If you’re still having trouble picking with your fingers, check out these 7 tips to get better at fingerpicking.
📘 Get the free Practice Blueprint: Build better habits and make your progress more consistent. Download the free guide →
JG