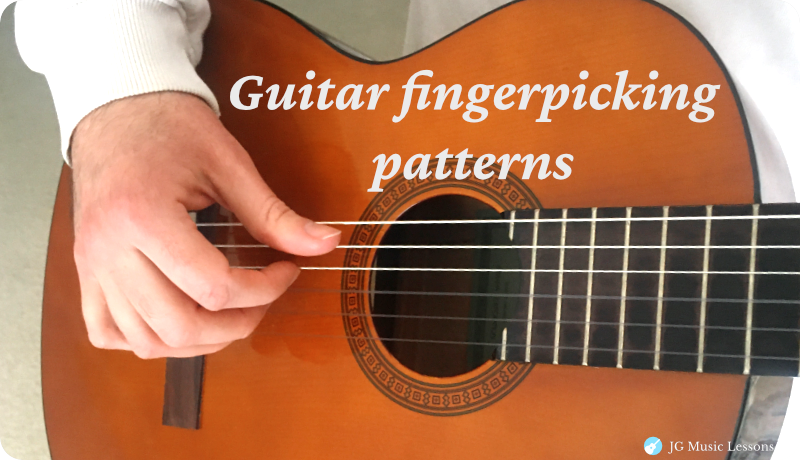
Fingerpicking is a beautiful and versatile guitar technique, but mastering it can feel daunting at first. If you’ve ever tried learning a song with fingerpicking, you may have noticed repeating patterns in your picking hand as the chords change. These patterns add rhythm, texture, and musical interest to your playing.
In this lesson, we’ll break down essential fingerpicking patterns, showing you how to apply them to different chords while building a strong rhythmic foundation. You’ll also find practical exercises with tabs designed to improve your precision, and finger independence. If you’re new to fingerpicking, we recommend starting with our introductory lesson on how to finger pick on guitar, which includes beginner-friendly exercises.
Let’s get started by reviewing the symbols used in fingerpicking notation.
Fingerpicking symbols explained
For the fingerpicking examples used in this lesson, we’ll use the following symbols:
P : thumb finger
i: pointer finger
m: middle finger
a: ring finger
c: pinky finger
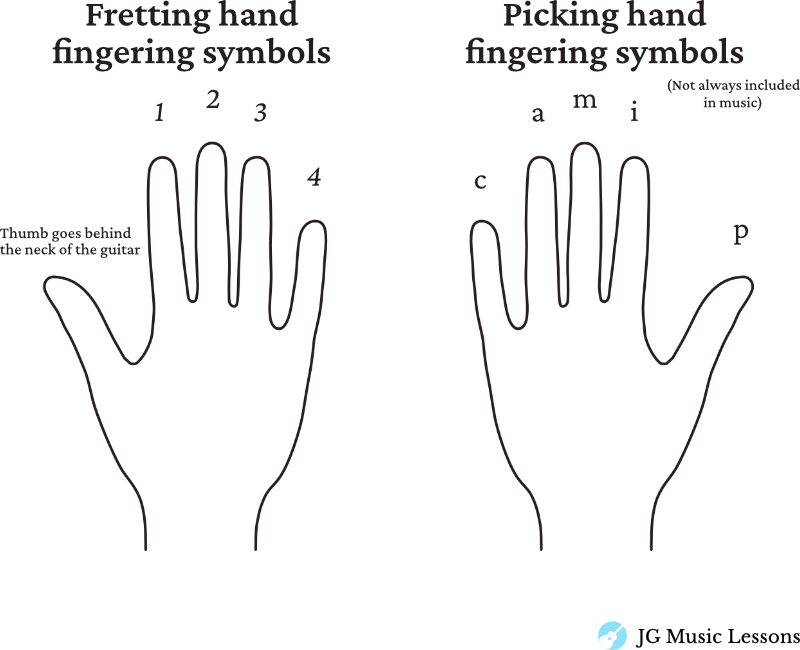
You can check this post for more in depth information about guitar notation symbols.
*Free for Pro Members
Chords for the fingerpicking examples
Here below are the chords we’ll be using for the fingerpicking examples in this lesson including the progression below the charts.
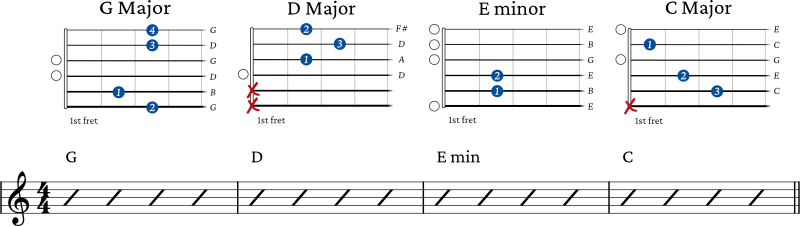
I suggest repeating every example or exercise below to get a better idea of the overall progression and transitions between chords.
We’ll start with easy picking patterns and gradually increase the difficulty.
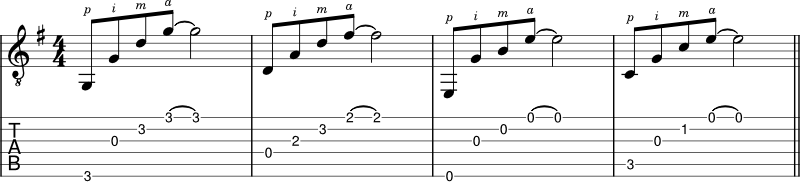
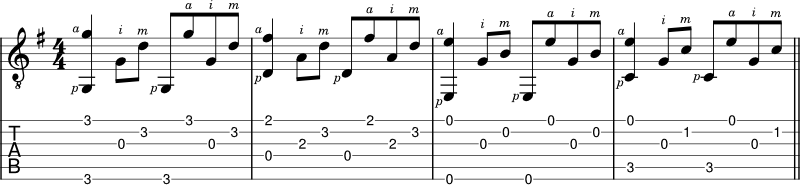
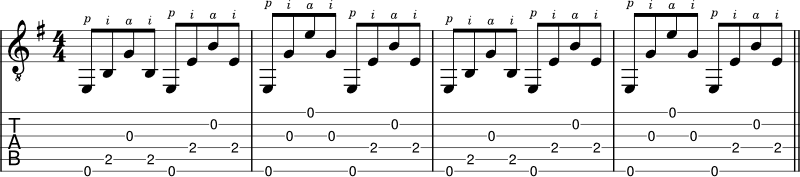
Fingerpicking pattern 1: simple arpeggio
For the first picking pattern example, we outline each chord by playing low to high notes. We sometimes skip strings in between a chord shape to end the pattern on the highest note. This is a simple arpeggio, which means to break up the notes of a chord instead of playing them all at once.
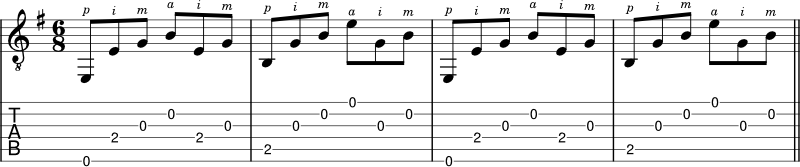
Fingerpicking pattern 2: arpeggio up and down
The next step is to play the chord arpeggio up then down. The rhythm can vary as you come back down the chord but here is one way that works well in 4/4 time.
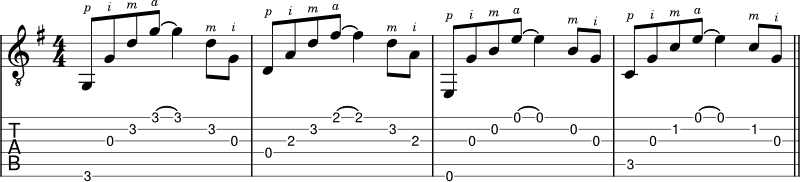
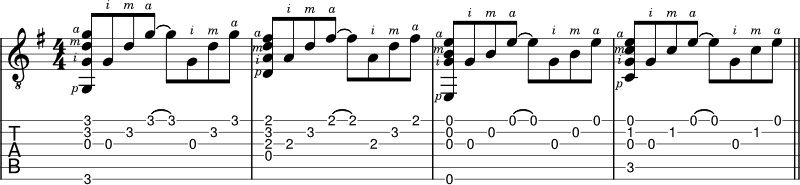
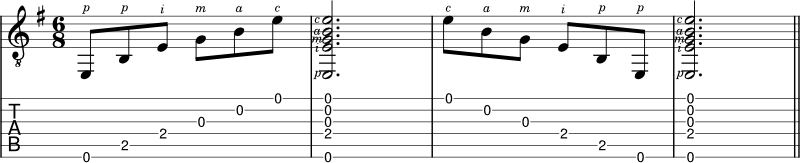
Fingerpicking pattern 3: mixed arpeggio directions
At this point, we start to mix up the directions for the chord arpeggio. In this pattern, we go up on beats 1 and 2 then mix up the directions on beats 3 and 4.

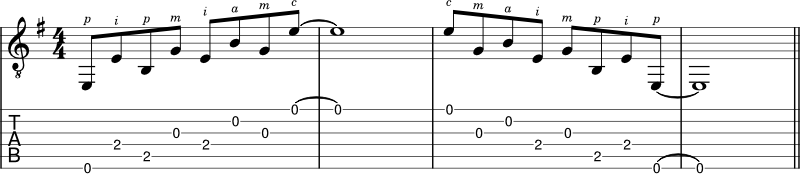
Fingerpicking pattern 4: mixed arpeggio directions variation
Here is another example of mixing arpeggio directions. In this pattern, we switch the direction on the 2nd and 3rd note but keep the pattern the same as the previous example.


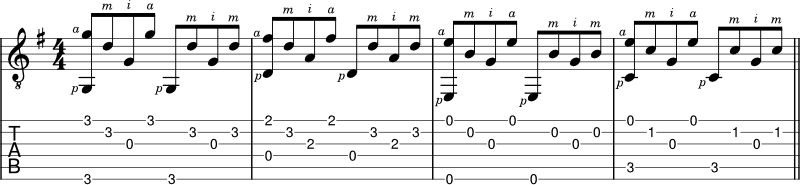
Fingerpicking pattern 5: using two notes on a beat
For this pattern, we are playing two notes on one beat. You’ll be picking the bass note and highest note of the chord shape to start each measure and then finishing from low to high, similar to pattern 1.
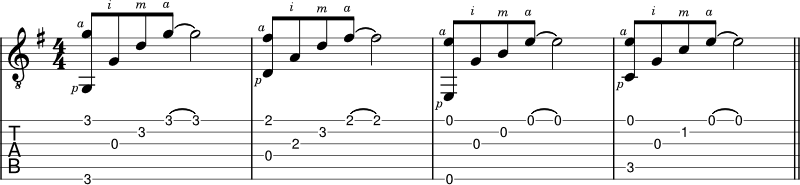
Fingerpicking pattern 6: using two notes on a beat
This is another example of playing two notes on a beat and then adding more notes to beats 3 and 4.
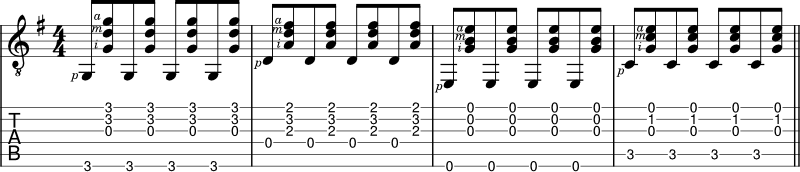
Fingerpicking pattern 7: using 4 fingers
This fingerpicking makes the chord sound fuller by using fingers 1, 2, 3, and 4 at once. Your thumb (finger 1) moves down while your pointer, middle and ring finger move up at the same time.
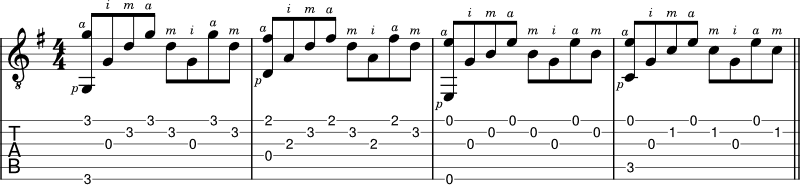
Fingerpicking pattern 8: using 4 fingers with arpeggios
Using the same concept of as the previous example, we’ll also break up the notes of each chord to create a flowing effect.
*Free for Pro Members
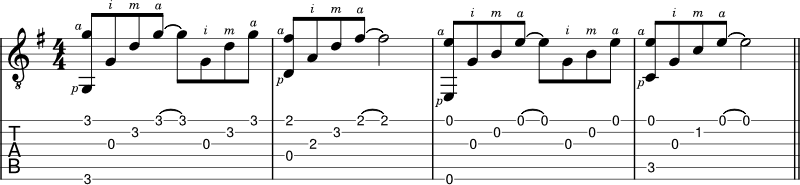
Fingerpicking pattern 9: repeating bass (Travis picking)
This is a popular fingerpicking pattern that includes a repeating bass note on beats 1 and 3 while the arpeggio continues to alternate on the higher strings. This was a characteristic style of picking by guitarist Merle Travis and is often referred to as Travis picking.
Fingerpicking pattern 10: repeating bass variation (Travis picking)
Here is another example of using a repeating bass pattern.
Fingerpicking pattern 11: creating sequences within a picking pattern
Another to consider when playing picking patterns is to create sequences to avoid sounding too repetitive. The sustaining note in measure two creates some space within the pattern. The sequence from measures 1 to 2 is repeated in measures 3 and 4.
Fingerpicking exercise 1 – alternating fingers, same bass note
The following exercises will help you to develop your technique and create more independence for each finger. I’ll be using an E minor chord for these exercises but you can apply this to other chords using 6 strings.
In this first picking exercise, the bass note stays the same while fingers 2, 3, and 4 change above. You go from low to high then back down from strings 4 to 2 and then do the same pattern with strings 3 to 1 as you’ll see below.

Fingerpicking exercise 2 – moving bass notes
In this 2nd picking exercise, your thumb moves on strings 6, 5, and 4 while your other fingers keep the same pattern.

Fingerpicking exercise 3 – string skipping
This exercise helps you to practice skipping between strings. You’ll see skips from strings 5 to 3, 4 to 2, and 3.
*Free for Pro Members
Fingerpicking exercise 4 – combining movements
In this exercise, we are combining movements between the thumb and other fingers. The thumb alternates between the 6th and 5th string while your other fingers also continue to move around the top strings.
Fingerpicking exercise 5 – using all picking fingers
Picking exercise 5 finally includes using the pinky which is not often used. However, an exercise like this can help you strengthen the weakest finger to pick. This exercise also makes you use your pinky when playing multiple notes at once.
Fingerpicking exercise 6 – string skipping using all fingers
Lastly, this exercise helps you work on skipping strings including all your fingers. The pattern is strings 6 to 4, 5 to 3, 4 to 2, and 3 to 1. Then you play the same skipping pattern from high to low.
For more advanced picking patterns, check out how to play Travis picking patterns on guitar.
Wrapping up
As you’ve seen, fingerpicking patterns are a powerful tool for adding depth and interest to your guitar playing. By understanding how these patterns relate to chord shapes, you can unlock endless rhythmic possibilities.
The key is consistent practice and experimentation. Apply the examples and exercises in this lesson to different musical contexts, explore time signatures, and most importantly, have fun! To further refine your technique, here are 7 ways to get better at finger picking. Keep exploring, keep learning, and keep creating!
To learn more, try out these warm up exercises to improve your guitar playing.
📘 Get the free guitar practice guide here!
All the best,
JG Music Lessons
📙 Kickstart your guitar playing with our step by step guide: Guitar Essentials.
🎸 Looking for a travel or half-sized guitar? See this one.
🛠 See our other music recommendations.
🤝 Support the site to help us to create better content for you!
Level up with the FREE guitar practice guide and effectively improve your playing! 🎸
Get it sent to your email!


The continuity across these little exercises is brilliant.
Thank you. I hope it helps!