Learning to play with your fingers on guitar is a very useful skill that will help you go a long way on your instrument. Finger picking, also know as finger style playing, provides a warm and rich sound from the sound of the guitar when playing melodies, chords and other rhythms elements.
Using your fingers instead of playing with a pick can give you a wider range of expression to play multiple notes on different strings.
Even if you have very little experience with this technique, these tips will help you to get better at finger picking on guitar.
Let’s get started!
1. Finding your technique
Although everyone’s hands are different and you may have ways to play that are more comfortable for you, there are some things to keep in mind for improving your fingerpicking technique.
Avoid tension in your hand
When first learning to use your fingers, you may find it quite uncomfortable to play for an extended period of time. This is normal as your fingers are learning to adjust to new movements and you are gradually building strength in your fingers.
You may feel discomfort when first learning but if the pain persists too strongly or for an extended period, you should to stop and take a break. Reevaluate how your are positioning your hand to avoid tension. Your wrist and hand should be relaxed when playing.
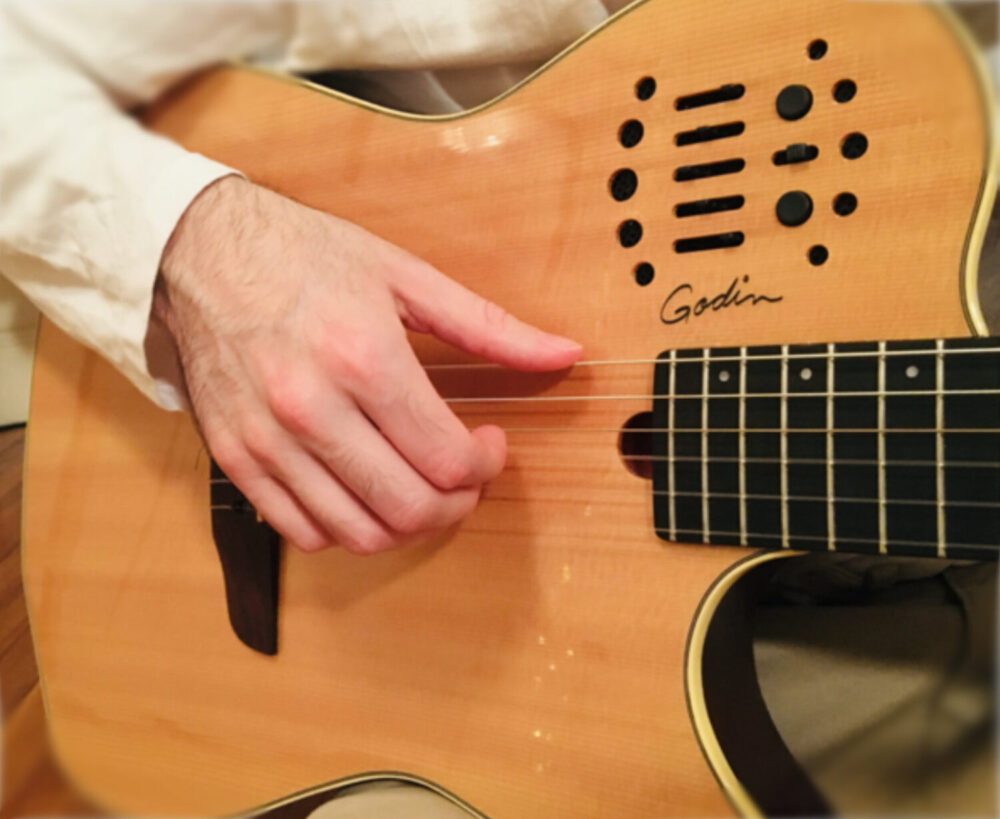
You shouldn’t need to twist or turn your hand but rather let your arm rest comfortably on the guitar so that your hand meets the strings at about a 45 degree angle as you’ll see in the image below.

Take breaks to relax and readjust technique
Again, if you find yourself overly tightening up your hand, wrist or arm, remind yourself to let go for a moment and take a minute break to relax. These breaks are essential for maintaining healthy practice sessions so that you can play for longer periods of time without injuring yourself.
When you are ready to play again, you can take a moment to evaluate your hand position and make sure that it feels relaxed again.
As you learn to relax and be mindful you are of how your hands and body feels while playing, you’ll be able to play for longer periods of time without discomfort.
Give space between your thumb and other fingers
Another practical tip for finger picking is to make sure your thumb is separate from your other fingers so that they don’t clash when playing. This is a common mistake I see in many people do when first learning to pick with their fingers.
The tendency is to unconsciously sneak your thumb under your fingers 2, 3, and 4 (index, middle and ring) which can make your picking sound sloppy and less efficient for your hand movement.
As you become aware of keeping your thumb out of the way, you can develop a more even sound when picking as well as avoiding any unnecessary movements.
The image you saw previously should also give you a better idea of how to space out your thumb from your other fingers.
2. Learn basic finger picking patterns
So how do you practice finger picking? A great I recommend practicing this technique is to learn basic picking patterns to get you started. Learning to play fingerpicking patterns is an essential skill to know as a guitarist because they create rhythm and interest to your chords. This will help you to get a good feel for how to move your fingers together.
There are two main techniques for picking with your fingers which are for playing single notes and the other incorporates all of your fingers which you can use with chords.
Here is an example of a picking pattern over a series these four chords: G Major, D Major, E minor and C Major. If needed, check this link for more on how to read guitar notation symbols.

Example for picking single notes (alternating fingers)
For this first technique, what you do is alternate between your 1st and 2nd finger (index and middle finger) to pick the strings when playing single notes melodies.
Here are an example to help you work on alternating your fingers. The initial ‘i’ represents your index finger and ‘m’ represents your middle finger.

Example for using fingers 1, 2, 3, and 4
For this technique where your use most of your fingers on your picking hand, you can use it after learning your first chords. This creates arpeggios, which means you outline certain notes of a chord by separating each note.
Here is an example to practice using most of your fingers to pick without pressing any chords yet. We’ll go over that in the examples ahead.

I cover other examples on another lesson about how to finger pick which helps you understand the finger numbers and hand position in more detail.
3. Learn variations of finger picking patterns
Now that you are familiar with some of the picking techniques, you can start to switch up the order of notes, add or omit certain notes from patterns you already know to create variations for practice.
For example, you could try a 3 single note pattern for alternate picking like this:

Arpeggio fingerpicking example
And here is an example of finger picking patterns using basic open chords.


4. Learn picking patterns from your favorite songs
Learning from songs is a great way to improve finger picking. Even if you simply learn one section of a song, you can extract material that you can apply in your own playing. Also, there is greater motivation to practice when learning from a song that you really enjoy.
Here is an example of a picking pattern based on the chord progression to Stand by me” by Ben E. King. This example is in the key of G Major.

You can also check out the songs with tabs resource on this site to learn other songs.
5. Practice with a metronome
Practicing with a metronome is way to check that your timing is even when finger picking or playing an arpeggio on a chord. Here is a free metronome on this site.
Always start out slowly and gradually increase the speed as you improve. Don’t force yourself to play at faster tempos if you haven’t mastered playing at a slower tempo.
The reason is that you don’t want to develop bad habits and poor technique for the sake of trying to rush the process. Don’t worry about speed when first learning to finger pick. Focus on developing a good technique with a clean sound and the speed will come over time.
6. Think like a composer
You might not think of yourself as a composer yet but there are a couple of things you can keep in mind when finger picking. As much as knowing basic music theory is important, your ears will help you to make better musical decisions than you might think.
Here are some things to keep in mind when finger picking.
Think of the top note for smooth chord transitions
A way you can make smooth transitions between chords is to think about the top note for every chord. You should try to play each chord in a way that the top note doesn’t jump around too much. There is no rule to this but you can tell if something doesn’t sound right when transition to another chord.
This has to do with the way you voice a chord, meaning how you order the notes. I talk more about this in the 6 different ways to play a Major chord.
Here is an example of switching chords which keep the top notes close together.

Create interest through sequences
Sequences are a nice way to create interest in your playing. This draws the listener because it creates a balance of predictable and unexpected parts to your picking.
Take a look at the following example to show you what I mean. The rhythm in measures 1 and 2 are different but the same rhyhm sequence repeats in measures 3 and 4.

Enhancing bass lines
As you get better at understand the notes in a scale and depending what key you are in, you can also add parts to the bass notes to make your playing sound fuller and interesting when using a finger picking style.
In this next example, we are in the key of D and I’m simply approaching the bass notes in measures 2 and 4 from scale notes below.

7. Record your playing
This last tip is a fun one to implement to any kind of practice you do on your instrument. I talk more about this on a post about the 6 benefits of recording to practice music.
It may seem awkward to hear yourself on a recording at first, but that is part of the fun. Learning to record is a way to practically apply everything that you are learning on the guitar and give you more insight on what is actually happening versus what you think you are playing.
Recording your playing can give you more ideas on how you can enhance certain finger picking patterns. As an exercise, try recording yourself play a series of melodies or chords. Then hear it back a few times and ask yourself how you can change or add certain parts to make it even better.
You can either record the new parts or another fun thing to do is record over what you already have to layer the music with multiple parts. Have fun with it!
Wrapping up
To sum things up, the 7 ways to get better at finger picking on guitar are:
- Finding your technique
- Learn basic picking patterns
- Learn variations of picking patterns
- Learn picking patterns from your favorite songs
- Practice with a metronome
- Think like a composer
- Record your playing
I hope you got some helpful ideas that you can help you to get better at finger picking. Be patient with the process as you apply these tips and you will begin to hear the results over time.
To learn some advanced picking patterns, check out how to play Travis picking patterns on guitar.
📘 Get the free guitar practice guide here!
Start Playing Better, Faster
with Pro Membership! ✨
Get the guidance, tools, and support that keep your progress on track:
🏁 Always know what to practice next. Access the full Guitar Learning Roadmap with lessons in sequence.
🎼 Play songs with confidence. Step-by-step lessons of popular, classical pieces and other styles.
📙 Save time and frustration. Clear PDFs and ebooks that save time so you can focus on playing.
🎟️ Get rewarded for consistency. 2 free downloads every month (a $240+ yearly value).
🎁 Keep costs low while you grow. 50% off all charts, tracks, and posters — up to 75% off bundles.
🚫 Stay focused. Ad-free environment keeps you in the zone.
💬 Get help when you need it. Direct member support to keep you on track.


