We’ve all been there. You learn your first scale shape (something like the typical Minor Pentatonic Box), and for a week, it feels like a breakthrough. But then you try to solo, and the frustration sets in. You feel like you’re stuck on a tiny island.
You know there are great notes further up the neck, but jumping to them feels like a leap of faith. The music stops, your flow breaks, and you retreat back to the safety of the box you know.
The problem isn’t your talent, it’s your map.
Why Box Shapes Keep You Stuck
Most guitarists learn scales vertically. You play up and down six strings in one fixed position, and that’s a solid foundation but it can actually trap your creativity. It subconsciously makes you think in “boxes” rather than melodies.
If you’ve ever felt like your solos are stuck in one spot, it’s because you’re playing on isolated islands.
The 3-Note-Per-String (3NPS) system is the “next level” upgrade. By playing exactly three notes on every string, we create a consistent physical pattern that allows you to slide between positions.
Think of these as the highways between the islands (the standard shapes you already know). Instead of jumping from one box to another and hoping for the best, you’re building a bridge that lets you move across the neck without breaking your flow.
Important: Is This For You? (The Level 2 Check)
Before we dive in, a quick reality check: If you don’t yet know your 5 basic “Box” shapes, go back and master those first: Major scale shapes lesson here. Those 5 shapes are your foundation. The 3NPS system uses 7 shapes, which can feel overwhelming if you’re still finding your footing.
We aren’t learning these to replace your boxes; we’re learning them for ease of movement. The goal isn’t to stay “locked” into these new shapes, either. It’s to get them under your fingers so that at any point during an improvisation, you have the freedom to transition exactly where the melody takes you.
The Major Scale Shapes (3 Notes Per String)
Many of these shapes share the same finger patterns across different strings, so once one clicks, others start to feel familiar. By the time you’ve worked through all seven, you’ll notice the same patterns repeating, which makes the whole system easier to internalize than it first appears.
We’re using C Major as our anchor here, but once these feel natural under your fingers, you can apply them to any scale or mode you want to explore. The goal isn’t to memorize isolated shapes. It’s to start seeing the fretboard as a connected grid you can move across freely.
How to read the scale charts
For the charts below:
- The left side shows the scale notes, while the right side indicates the suggested fingerings.
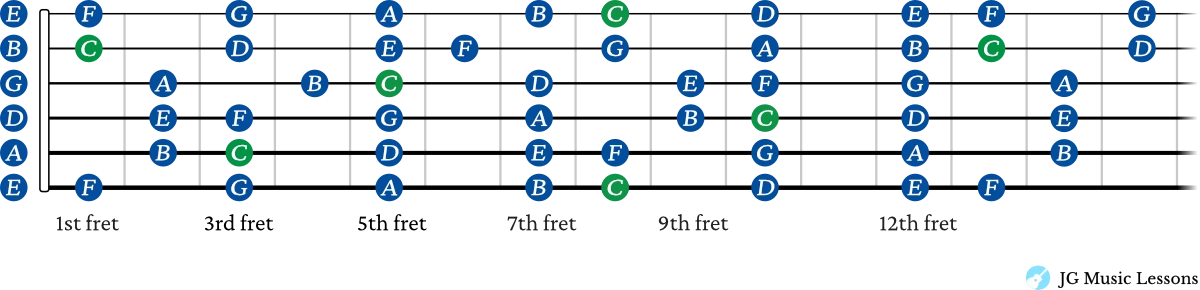
- The lowest horizontal line represents the thickest string (low E), and the top horizontal line represents the thinnest string (high E).
- Green circles indicate the root notes of the Major scale, while blue circles represent the other scale notes.
- Circles to the left of the chart indicate open strings.
If needed, check this link for more on how to read guitar notation symbols.
Shape 1


Shape 1 (All Fretted Notes)
If your guitar is suitable to play past the 12th fret, you can also play shape 1 like this:

Shape 2


Shape 3


Shape 4


Shape 5


Shape 6


Shape 7


Scale Shapes Connected
To show you how the Major scale shapes connect, here are all of the C Major scale notes across the guitar fretboard below.
Application Examples
This is where it comes together. The examples below show what it actually looks like to move across the neck instead of staying locked in one position. Work through them slowly and notice how the shapes connect. That feeling of flowing between positions, without stopping to hunt for your next note, is exactly what you’re building toward.
Example 1: E Major Scale (3 Octaves)
By adding slide points between scale shapes we’re able to play a span of 3 octaves for a scale. See the slide markings to know where to shift your fingers on a string.


Included in Pro Membership ✨
Wrapping Up
3NPS is one piece of the puzzle. If you want to know exactly where it fits in your playing, what to work on before it, and what comes next, that’s what the Pro roadmap is built for. Every concept has its place in a clear sequence, so nothing feels random.
📘 Get the free Practice Blueprint: Build better habits and make your progress more consistent. Download the free guide →