
Scale shapes are useful because they give you clear fretboard positions to practice. But if you always stay inside one shape, it can be difficult to move smoothly into another part of the neck while you’re playing.
The 3-notes-per-string system gives you another way to organize Major scale notes across the fretboard. Its consistent finger patterns can make it easier to shift between positions and create longer lines that move horizontally across the neck.
In this lesson, we’ll learn the seven 3-notes-per-string Major scale shapes, see how they connect, and apply them through examples that move across several positions.
Skill Builders Roadmap Focus · View Roadmap →
Start with one 3-notes-per-string Major scale shape and locate its root notes. Then connect it to one neighboring position and practice carrying a short phrase across both shapes without stopping.
Start with the standard Major scale shapes
The 3-notes-per-string system works best once you’re already comfortable with the standard Major scale shapes. Those positions give you a useful reference point for seeing how the same scale notes can be organized in a different way.
Think of 3NPS as another tool for navigating the fretboard, especially when you want to move through several positions in one musical line.
The Major Scale Shapes (3 Notes Per String)
The seven shapes below organize the Major scale with three notes on each string. You’ll notice the same fingering patterns repeating across different strings and positions.
We’ll use C Major as the reference key. As you work through the shapes, pay attention to the green root notes and look for where one position overlaps with the next.
How to read the scale charts
For the charts below:
- The left side shows the scale notes, while the right side indicates the suggested fingerings.
- The lowest horizontal line represents the thickest string (low E), and the top horizontal line represents the thinnest string (high E).
- Green circles indicate the root notes of the Major scale, while blue circles represent the other scale notes.
- Circles to the left of the chart indicate open strings.
If needed, check this link for more on how to read guitar notation symbols.
Shape 1


Shape 1 (All Fretted Notes)
If your guitar is suitable to play past the 12th fret, you can also play shape 1 like this:

Shape 2


Try this: Choose Shape 1 or Shape 2 as your starting position. Play it slowly, locate the C root notes, then compare it with the neighboring shape. Look for where the two positions overlap before moving farther up the neck.
Shape 3


Shape 4


Shape 5


Shape 6


Shape 7


Scale Shapes Connected
The full C Major fretboard below shows how the seven positions fit together. Instead of seeing each shape as a separate pattern, look for shared notes and nearby fingerings that can help you move from one position into the next.
Pick one connection between two neighboring shapes and practice crossing that point in both directions.
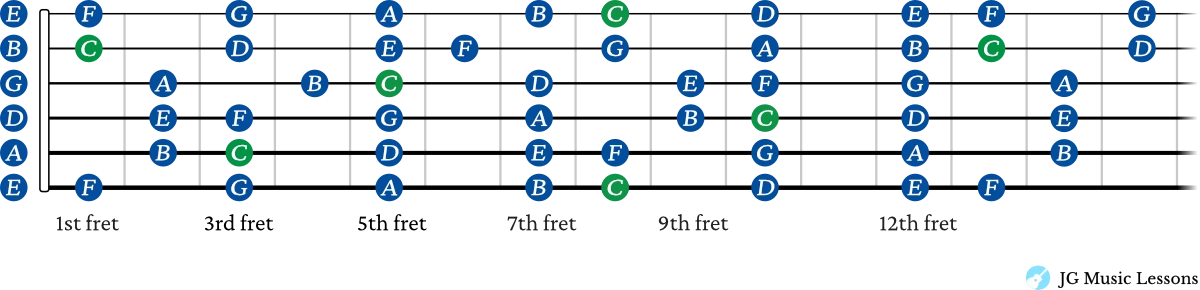
Use the JG Fretboard Visualizer to compare the seven C Major shapes above. In View, choose Shape 1, then under Shape system choose 3 notes per string (7). Labels show note names or scale degrees, rather than finger numbers.
Fretboard Visualizer
Choose a key, then tap a note to explore.
Choose a last fret higher than the first. The board keeps the previous valid range.
Highlights pitch classes relative to the root. Note names repeat in different octaves; this is not an exact distance from one starting position.
Open the full Fretboard Visualizer
Note identification
Can you name any note on the fretboard?
Connect two 3NPS shapes: Compare Shapes 1 and 2. Find their shared notes and C roots, then play a short phrase that moves from one shape into the next and back.
Application Examples
The following examples show how 3NPS shapes can help you move through several fretboard positions in one line. Pay attention to the slide or shift points that connect one area of the neck to the next.
Example 1: E Major Scale (3 Octaves)
By adding slide points between scale shapes we’re able to play a span of 3 octaves for a scale. See the slide markings to know where to shift your fingers on a string.

Included with Pro
Take this lesson a little further.
This bonus section is included with Pro Membership. Pro also gives you the full Guitar Roadmap to keep your learning in order, plus direct access to me when something isn’t clicking.
Already a member?
Log in →
Included in Pro Membership ✨
Wrapping Up
The 3-notes-per-string system gives you another way to see Major scale notes across the fretboard. Its main advantage here is movement: instead of staying inside one position, you can use neighboring shapes and shifts to carry a musical line across the neck.
Start with one shape, connect it to the position beside it, and practice crossing that boundary smoothly. Once that feels comfortable, expand the same idea into longer scale lines and different keys.
Then use that movement musically. Create a short phrase that begins in one position and finishes in another rather than only running the scale from bottom to top.
Before continuing
You’re ready to continue when you can play one 3-notes-per-string Major scale shape, locate its root notes, connect it to one neighboring position, and carry a short phrase across both areas without stopping.
Next: Continue in the Skill Builders Roadmap to keep developing how you navigate and apply scales across the fretboard.
📘 Get the free Practice Blueprint: Build better habits and make your progress more consistent. Download the free guide →