
Want to learn guitar but not sure where to begin? One of the most effective places to start is with a small set of basic chords. By focusing on just a few core shapes, you can start playing real songs much sooner than you might expect.
In this lesson, we’ll focus on a small group of essential chords that form the foundation of countless songs. Most of them are open chords, which use one or more open strings and are a great place to start because they’re easier to play and sound good early on.
Grab your guitar, take it one step at a time, and let’s get started.
Included in Pro Membership ✨
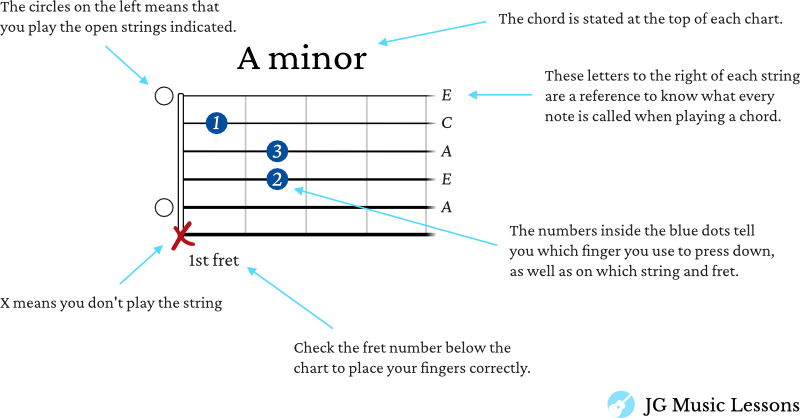
How to read the guitar chord charts
If this looks a little confusing at first, don’t worry. It will start to make sense once you see a few examples below.
For the charts below:
- The lowest horizontal line represents the thickest string (Low E). The top horizontal line represents the thinnest string (high E).
- The vertical lines represent the frets on the guitar (thin metal lines on your guitar fretboard)
- The numbers inside the circles tell you what fingers to use to press down on your fretting hand (see the fingering chart in the following section)
Take a look at the image below to better understand the chord charts in this lesson.
Fretting hand fingering chart
The chart below shows you what numbers are used to represent your fingers for the fretting hand (the one used to press down on notes).
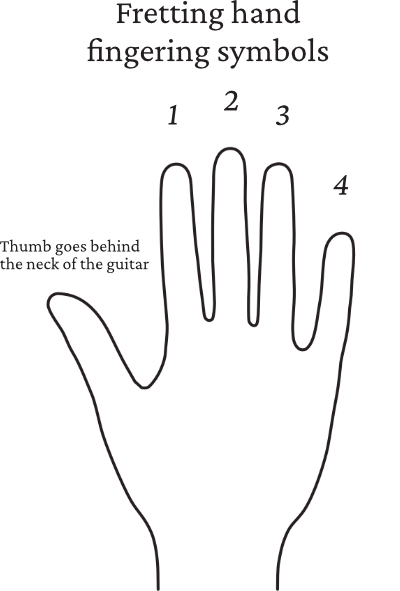
You can check this link for more on how to read guitar notation symbols.
Now, let’s start going through each guitar chord.
E minor chord
This chord is commonly written as E min or Em in music notation. To play an E minor chord, you can either use your pointer and middle finger or middle and ring finger to press down on the 2nd fret of the 5th and 4th string. Once you have the shape down, you can strum all the strings from lowest to highest string. Here are the two ways to play this chord below:
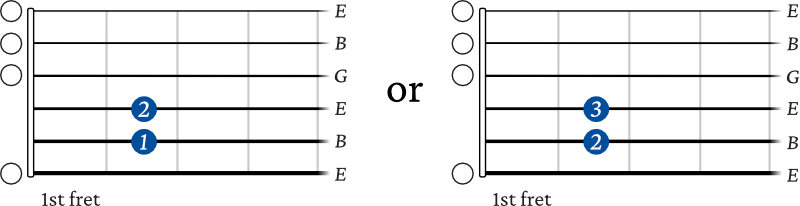
For the audio of this E minor chord, you will hear the chord being played one string at a time and then all the notes together.
For more on this chord, check out 9 ways to play an E minor chord on guitar.
E Major chord
This E Major chord has one extra note added to the previous E minor chord shape. You simply need to add your 1st finger to the 3rd string, 1st fret like this:
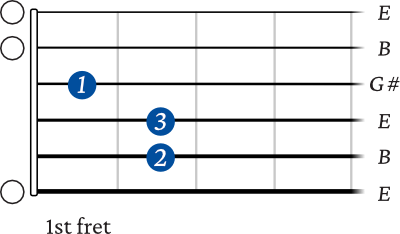
Compare how the Major and minor chord sound different. Major chords have a bright sound as opposed to minor chords that have a darker sound.
For more on this chord, check out 12 ways to play an E chord on guitar.
A minor chord
This chord is commonly written as A min or Am in music notation. For this A minor chord, you can simply take the previous E Major chord shape and bring each finger up one string higher. Make sure to strum this chord from the 5th string down, since there is an X on the 6th string here.
For more on this chord, check out 12 ways to play an A minor chord on guitar.
A Major chord
To play this open A Major chord, you play the 2nd fret on the 2nd, 3rd and 4th string. This is an easy shape to remember since the notes are all in a row. You can play this with fingers 1, 2, and 3 or 2, 3, and 4.
A common challenge with this chord is accidentally muting nearby strings if your fingers collapse or crowd together. Try keeping your fingers slightly arched and close to the frets so each string rings clearly.
Try playing both variations to see which way is more comfortable for you.
For more on this chord, check out 12 ways to play an A chord on guitar.
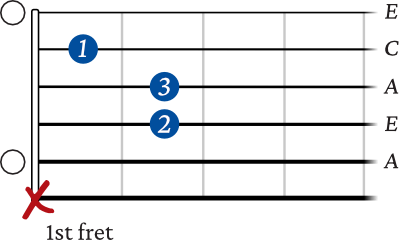
C Major chord
This chord can be a little trickier to play because you have a wider stretch between your fingers. Fingers 1 and 2 are in the same position as an A minor chord but your 3rd finger will now be placed on the 5th string, 3rd fret like this:
*Tip: Try to keep your fingers slightly arched as you press down on a chord so that you use more of the tip of your fingers to prevent certain strings from accidentally being muted.
For more on this chord, check out 14 ways to play a C chord on guitar.
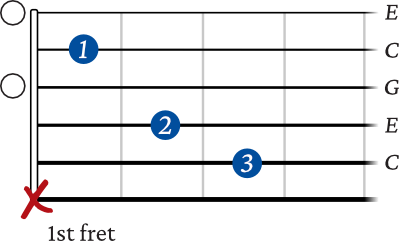
G Major chord
The G Major chord is unlike the other chord shapes we looked at. This one can also take a little longer to master because of the wide stretch between some of your fingers. Here is what the G chord shape looks like:

For more on this chord, check out 15 ways to play a G chord on guitar.
D Major chord
The D Major chord should be easier to play than the last two chords because the notes that you need to press are close together. For this D chord, you will need to play from the 4th string down, being careful not to play the 5th and 6th string.
For more on this chord, check out 14 ways to play a D chord on guitar.
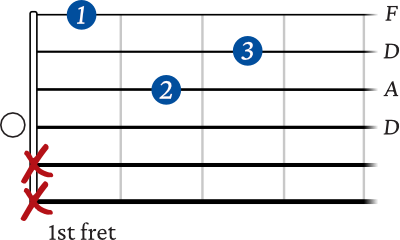
D minor chord
Lastly, we have the minor version of the previous chord. This is commonly written as D min or Dm chord in music notation. You can keep your 3rd finger in the same position as the D Major but you have to rearrange your 1st and 2nd finger to play this chord. You are essentially just playing the 1st string, 1st fret instead of the 2nd fret.
For more on this chord, check out 11 ways to play a D minor chord on guitar.
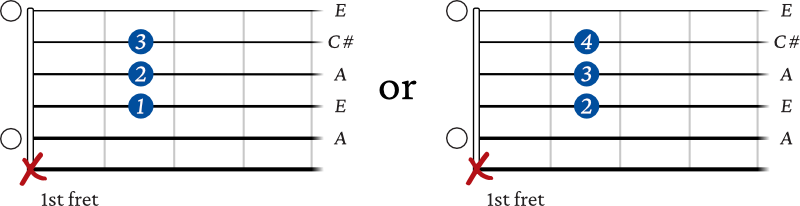
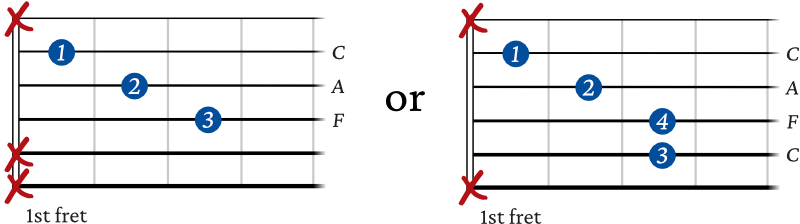
F Major chord
As I mentioned earlier, this last chord is the only one here that doesn’t use open strings. The first string shows an X here because that would technically make it an F Major 7 chord. Adding the first string may work on some songs but other times you might want to avoid it. Try experimenting and use what sounds best to you.
The second chord option on the right can also be referred to as F/C (F over C).
To learn other chord variations, check out 13 ways to play an F chord on guitar. You can also learn more about slash chords here.
Practical Application: A Simple Way to Practice Basic Chords
Most beginners learn chord shapes, but they skip the step that makes everything else easier later: building clean, repeatable chord shapes before worrying about speed or changing chords.
Use this short, simple routine to make sure each chord is solid and ready to connect smoothly in future lessons.
Step 1: Build One Clean Chord at a Time
Choose one chord only.
- Place your fingers carefully
- Press just hard enough for a clean sound
- Strum each string slowly
If a note buzzes or mutes, adjust finger placement before moving on.
Goal: Every string rings clearly, not fast playing.
Step 2: Press, Relax, Reset (30–60 seconds)
- Press the chord
- Relax your fingers slightly, without losing the shape
- Press again into the same shape
Repeat slowly.
This helps your hand learn the chord shape without gripping too hard. By staying lightly in position, you reduce unnecessary movement and keep the shape stable and relaxed over time.
Step 3: Short Hold and Release Drill
- Hold the chord for about 3 seconds
- Release your hand completely
- Rebuild the same chord again
Do this 4-6 times per chord.
This reinforces muscle memory so your fingers land in the right place consistently.
Step 4: Light Strumming Check
Once the chord feels comfortable:
- Strum simple downstrokes
- Keep your strumming hand moving freely
- Focus on tone and relaxation, not patterns yet
If tension builds, pause and reset.
Step 5: Repeat with 2 – 3 Core Chords Only
For this lesson, choose just two or three basic chords total.
Examples:
- G and E minor
- C and A minor
- D and G
At this point, the focus isn’t speed. You’re simply getting your hands comfortable now so chord changes feel easier when we get there.
Included in Pro Membership ✨
Wrapping Up
Once your chord shapes feel comfortable and consistent, here are a few simple ways to keep moving forward:
- Learn how to connect chords smoothly without stopping the rhythm
- Try playing real music with these beginner level songs
- Add rhythm using these easy guitar strumming patterns
- Practice flow with these 7 easy guitar chord progressions
📘 Get the free Practice Blueprint: Build better habits and make your progress more consistent. Download the free guide →