
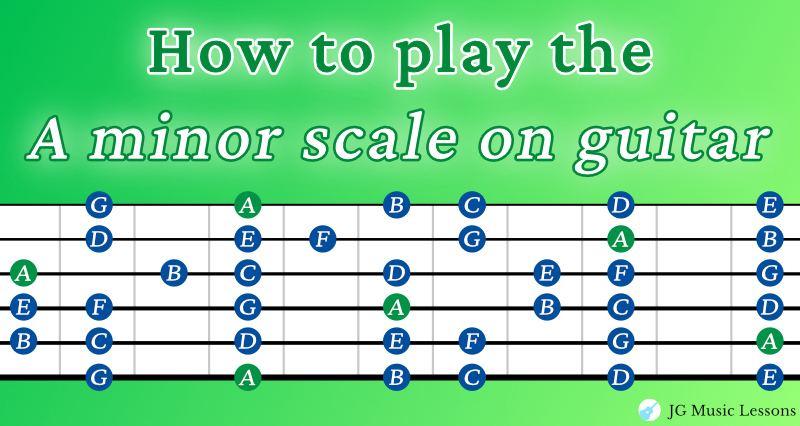
The A minor scale is one of the essential scales to know on guitar. You might have learned it in the first position of the guitar, but the next step is to learn the same set of notes throughout the fretboard. This lesson covers the 5 scale shapes for effectively playing the A minor scale on guitar.
If you still aren’t confident about naming the notes on the guitar, I recommend checking out these 7 tips to learn the notes on the fretboard.
Grab your guitar and let’s get started!
Foundations Roadmap Focus · View Roadmap →
Your goal is to play one A minor scale shape from memory, identify its A root notes, and begin seeing how it connects to another position. Notice that A minor uses the same notes as C Major from the previous lesson.
A minor scale theory
To help you understand the A minor scale, let’s first go over some music theory before playing it. The A minor scale has the notes A, B, C, D, E, F, and G. These notes come from the minor scale formula which has specific steps between each note (whole, half, whole, whole, then half, whole, whole step). See the formula with the A minor scale notes below.
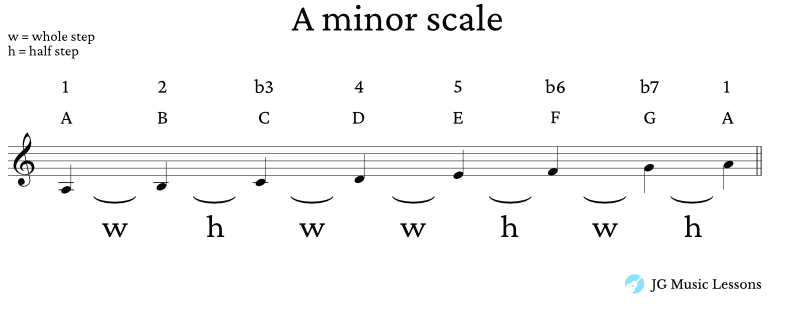
You can also think of the notes in the minor scale in terms of intervals related to the root note. The intervals in a minor scale are unison (with the root note), perfect 2nd, minor 3rd, perfect 4th, perfect 5th, minor 6th, and minor 7th.
Another method that you can use to learn any minor scale is to memorize the key signature. In this case, the A minor scale has no sharp or flats (same as the C Major scale).
Note that this scale is also known as an A natural minor scale or A aeolian scale, which is not the same as the melodic minor, harmonic minor, or Dorian scale. See the difference between minor scales here.
How to read the scale charts
For the charts below:
- Charts on the left side show you the scale notes and charts on the right show you the suggested fingering.
- The lowest horizontal line represents the thickest string (Low E) and the top horizontal line represents the thinnest string (high E).
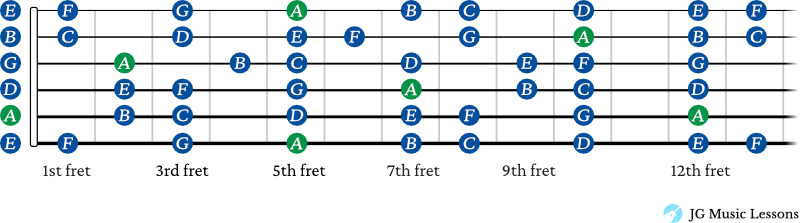
- The green circles represent the root note of the minor scale and the blue notes are every other scale note.
- Circles to the left of a chart represent open strings.
If needed, check this link for more on how to read guitar notation symbols.
5 A minor scale shapes
This section shows the A minor scale in five different areas of the fretboard. Start with one shape and practice it until you can play it ascending and descending without looking at the chart. Then explore the shape directly before or after it to see how the positions connect.
A minor scale shape 1
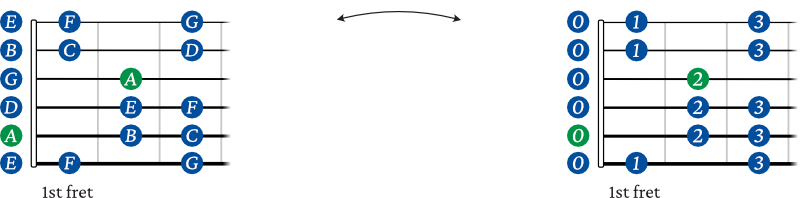
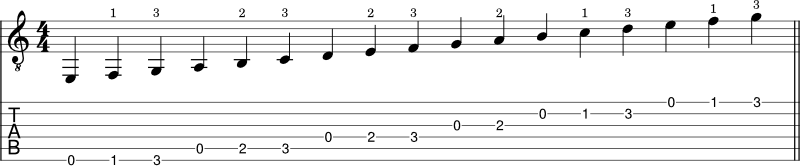
For the notation below, the numbers above the notes suggest what fingers to use for your fretting hand.
A minor scale shape 2
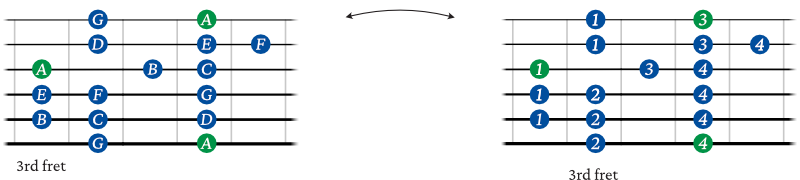
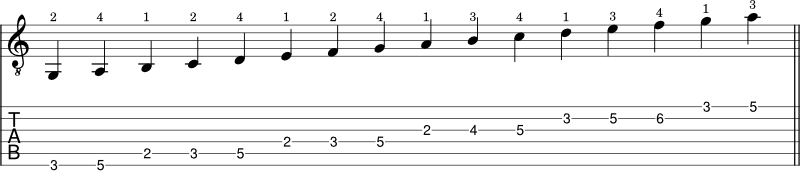
A minor scale shape 3
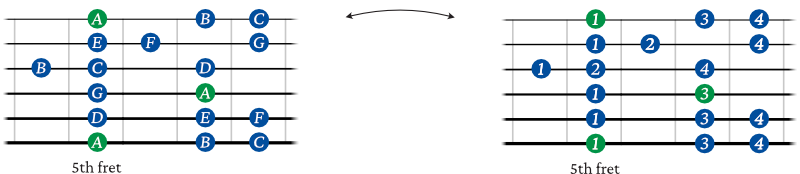
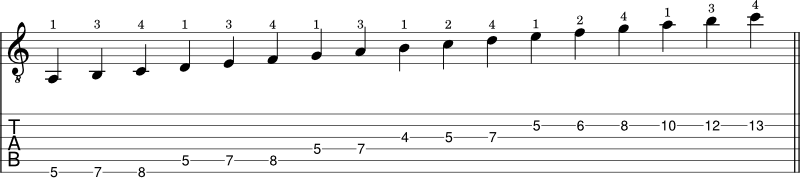
A minor scale shape 4
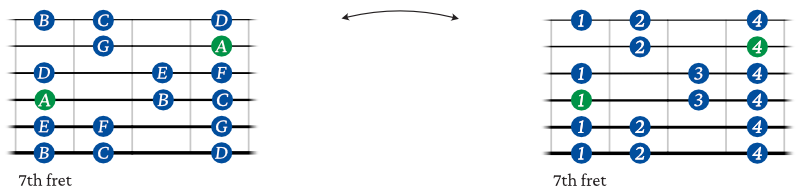
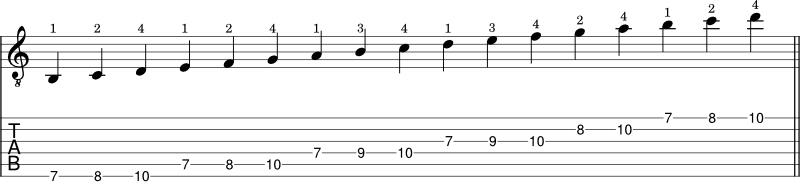
A minor scale shape 5
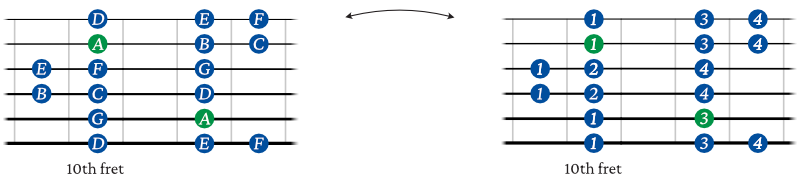
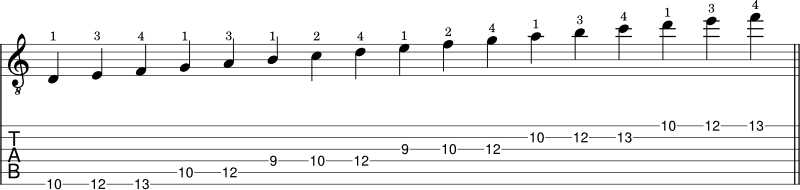
Go deeper: These same minor scale shapes can also be moved to other keys. For now, focus on getting comfortable with the A minor positions before worrying about applying every shape to other root notes.
All the A minor scale notes on the fretboard
Finally, here are all of the A minor scale notes on the fretboard below. This is essentially all of the scale shapes connected.
You can also check out this other lesson to learn the A Major scale on guitar.
3 tips for memorizing the minor scale shapes
Here are 3 quick tips to help you memorize the 5 minor scale shapes.
1. Learn one shape at a time
Once one shape feels comfortable, add the position directly before or after it. Look for notes the two shapes share and practice moving between them slowly. You can keep expanding this connection over time rather than trying to memorize the entire fretboard at once.
The way I recommend learning and memorizing any scale is to start memorizing one particular shape that feels most comfortable for you. Try to really get the shape under your fingers to the point where you don’t have to look at the chart. Use the first shape you master as a guide to learn the other scale shapes around it.
2. Look for repeating fingering patterns
Look for patterns such as what strings repeat the same fingering within a shape.
Tip: The notes on the first and sixth string will always be the same.
For example, in shape 4 we see that the 1st, 5th, and 6th string follow a 1, 2, and 4 finger pattern. The 3rd and 4th string follow a 1, 3, and 4 finger pattern. The 3rd string has the unique finger pattern of fingers 1 and 3. Knowing where note patterns repeat will help you build a mental map of a scale shape.
3. Connect shapes around the ones you learned
After learning one of the scale shapes well, either learn the shape that comes before or after it to see how the notes connect on the fretboard. Again, try to master one shape at a time and make sure you can play it without looking at the chart. This will make the process more approachable by breaking it down into smaller sections before moving on to the next shape.
Wrapping up
Learning the A minor scale in more than one position helps you see how the same notes continue across the fretboard. Start with one reliable shape, learn where the A root notes are, and gradually connect another position beside it.
Because A minor and C Major share the same notes, you can also start noticing how the Major and minor scale shapes you learned in this module relate to each other. These connections will become more useful as you work with melodies and improvisation later on.
If you want to dive deeper, I recommend checking out this guide on how to practice scales on guitar.
Before continuing
You’re ready to continue when you can play one A minor scale shape ascending and descending without looking at the chart, identify its A root notes, and show where one neighboring shape connects.
Keep adding positions gradually as you use them in future lessons and songs.
Next: Continue in the Foundations Roadmap to review Module 5 and check your scale foundation.
📘 Get the free Practice Blueprint: Build better habits and make your progress more consistent. Download the free guide →