
Bending gives you a way to change the pitch of a note after you play it. Instead of simply landing on a note and holding it, you can raise the pitch into another note and give the phrase more movement and expression.
In this lesson, we’ll work on the mechanics of a bend, learn how to hear the target pitch, then apply bends inside familiar minor pentatonic phrases.
Skill Builders Roadmap Focus · View Roadmap →
Start with a whole-step bend. Play the target note first, then bend up to match that pitch as closely as you can. Once the bend is accurate, use it inside a short minor pentatonic phrase while keeping the rhythm steady.
What bending actually is
Bending changes the pitch of a fretted note by pushing the string sideways across the fretboard. For example, a whole-step bend from the 10th fret of the B string should reach the same pitch as the note at the 12th fret.
The important part is the target pitch. A clean bend reaches the note you’re aiming for rather than stopping somewhere between the starting note and the target.
How to bend a string
Which fingers to use
Use your third finger to fret the note and place your first and second fingers behind it on the same string for support. Those fingers help the bending finger control the string and keep the movement stable.
The wrist rotation motion
Rather than relying only on finger strength, use the rotation of your wrist to help drive the bend. This gives your fingers more support and makes the movement easier to control.
Anchor your thumb over the top of the neck, or behind it for more grip. Then rotate your wrist forward, as if slowly turning a motorbike throttle toward you. Your fingers move because your wrist moves them. The string pushes upward on strings 1-3, and downward on strings 4-6.
Practice the rotation without picking the string first. Get the feel of the wrist driving the movement before you add sound.
How to hear “in tune” vs “flat”
The most common mistake is not pushing far enough, so the pitch lands flat and uncertain.
Here’s the fix: play the target pitch first by fretting it normally, memorize the sound, then bend up from two frets below to match it. On the 10th fret of the B string, your target for a whole-step bend is the pitch of the 12th fret. Play the 12th fret, then bend from the 10th until you match the sound.
A half-step bend targets one fret up. A whole-step bend targets two frets up.
Try this: Play the target note at the 12th fret, then bend from the 10th fret to match it. Alternate between the fretted target and the bend several times and listen closely to whether the bend lands below, above, or directly on the target pitch.
Notation for Bends
Here’s a look at the different bend types you’ll come across with standard and tabs notation as well as audio examples.
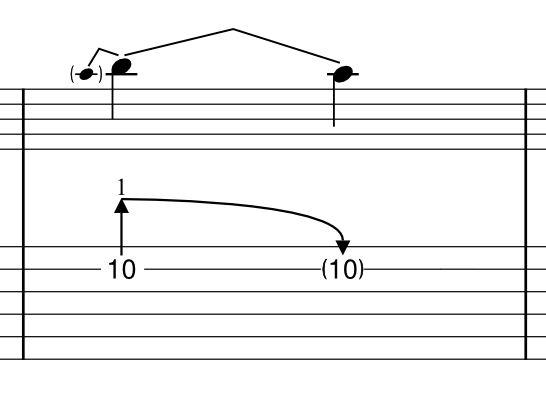
These bends are notated with an arrow showing the direction of the bend, and a number telling you how far to bend. A “1” means a full step, “1/2” means a half step, and “1/4” means a slight quarter-step bend. When you see a curve going up and then back down, like in the bend and release, you bend up to the target pitch and then bring it back to where you started.
Start with the whole-step bend and bend-and-release. Then use the other examples below to explore additional bend sounds and notation as your control improves.
Whole Step Bend
Bend the note up a full step, the same distance as two frets. This is the bend you’ll probably use most.

1/2 Step Bend
Bend up a half step, the distance of one fret. Smaller and tighter than a whole step, common in blues and rock phrasing.

1/4 Step Bend (Slight Bend)
A slight bend raises the note less than a half step. In blues and rock phrasing, it is often used for color and expression rather than aiming for the next fretted note.

Bend and Release
Bend up to the target pitch, then bring it back down to where you started. The note rises and falls in one continuous move.

Grace Note Bend
A very fast bend into the main note, played quickly that the starting note barely registers. It works as a small ornament leading into the note you actually want to land on.

Pre-bend
Bend the string up before you pick it, then strike the already-bent note. The listener hears the target pitch with no audible rise.

Pre-bend and Release
Bend up silently before picking, strike the note, then release down to the lower pitch. The opposite feel of a normal bend, the note falls instead of rising.
Common bending mistakes
Listen for these three problems as you practice your bends.
1. Bending flat
If the bend stops below the target pitch, play the target note again and compare. Let your ear tell you how much farther the bend needs to travel.
2. Bending with finger strength instead of wrist rotation
The note goes sharp or uneven, and your forearm starts tensing up. That tension means you’re using the wrong muscle. The wrist generates the arc. The fingers just maintain contact.
3. Not using your support fingers
The bend feels weak or inconsistent. Make sure your first and second fingers are pressing down behind the bending finger every time. They do more work than you realize.
Applying bends to the B minor pentatonic scale
If you’ve been through the minor pentatonic scales lesson, you already know Shape 1 in B minor starting on fret 7. That means frets 7 and 10 on the B and E strings, and frets 7 and 9 on the 3rd, 4th, and 5th string.
The phrases below put bends inside the B minor pentatonic shape. You’ll also see techniques from the hammer-ons and pull-offs lesson, so you can begin combining different articulations inside the same lead line.
Phrase 1 – Whole Step Bend
This phrase uses a whole-step bend on the B string. Notice that the target pitch also appears later in the phrase as a normally fretted note. Use that note to check the accuracy of your bend.

Phrase 2 — Pre-bend and Release
We start the phrase with a half step prebend on the b5 note which outlines a B minor blues scale.

Phrase 3 — Bend and Release
For this phrase, the bend and release takes us from the note A to B and back to A.

Try this: Choose one phrase above and make the bend your main focus. First play it slowly enough that the bend reaches the target pitch. Then create a short phrase of your own in the same pentatonic shape using one accurate bend.
Leave some space after the bend so you can hear where the pitch lands before continuing the phrase.
Practice routine (10-15 minutes)
Minutes 1-5: Pitch accuracy
Play the 12th fret on the E string to set the target pitch in your ear. Put your ring finger on the 10th fret and bend up to match it. Hold for two beats, release, and repeat a few times until it sounds clean. Then move to the B string, 10th fret, bending up to match the 12th fret pitch.
Minutes 6-10: Bend and release
Practice the bend-and-release example slowly. Match the target pitch on the way up, then control the pitch as you return to the starting note.
Minutes 11-15: Musical phrase
Choose one or two of the phrase examples and play them at a tempo where the bends consistently reach the target pitch. If the phrase breaks down, isolate the bend first, then put it back into the full line.
Included in Pro Membership ✨
Wrapping Up
Bending adds movement to a single note, but the effect depends on your control of the pitch. The first goal is simply being able to hear a target note and bend accurately into it.
Start with whole-step bends, use your wrist and support fingers to control the movement, and compare every bend with the target pitch. Then bring the technique into the minor pentatonic phrases you already know.
As the pitch becomes more reliable, you can explore bend-and-release, pre-bends, slight bends, and other variations to shape your phrases in different ways.
Before continuing
You’re ready to continue when you can match a whole-step bend to its target pitch, hold the bend with reasonable control, and use an accurate bend inside a short minor pentatonic phrase while keeping the pulse steady.
Next: Continue in the Skill Builders Roadmap to keep developing your lead-playing technique and phrasing.
📘 Get the free Practice Blueprint: Build better habits and make your progress more consistent. Download the free guide →