Whether you’re just starting out or you’ve been playing for years, learning the notes on the guitar fretboard is a key step toward truly understanding your instrument and the music you play.
Maybe you’ve put it off because it seemed overwhelming or confusing—or it just hasn’t felt essential until now. But learning the notes is more straightforward than it might seem, and it can make a huge difference in how you play.
Once you know where the notes are, you’ll move around the neck with greater ease, unlock new musical ideas, and play with more confidence.
In this lesson, we’ll share 7 practical tips to help you memorize the notes on the fretboard more effectively. Grab your guitar, and let’s dive in!
Included in Pro Membership ✨
1. Learn the 12 notes (sharps, flats, and steps in between)
There are 12 notes in music when you include all the natural notes along with their sharps and flats. A sharp symbol (#) raises a note by a half step, while a flat symbol (♭) lowers it by a half step.
The key to understanding how notes are laid out on the fretboard is knowing which ones don’t have a sharp or flat between them.
There are two pairs of notes that move directly to each other with no sharp or flat in between: B to C and E to F. These are the exceptions to remember.
Check out all of the notes in order here below:
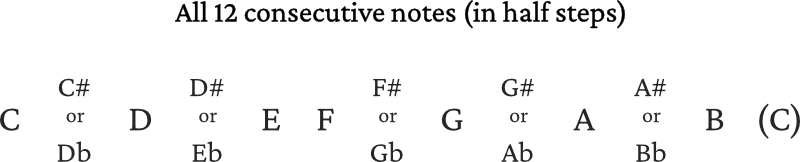
When you include all the natural notes along with their sharps and flats, you get what’s called the chromatic scale—a series of 12 notes, each one spaced a half step apart.
This bit of music theory is essential for learning the fretboard. It gives you the framework to understand how notes are laid out on the guitar.
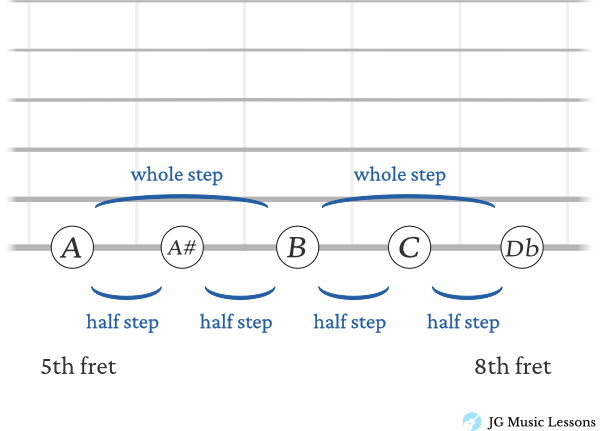
On the fretboard, each fret represents a half step—including the distance from any open string to the first fret. So, moving up one fret raises the note by a half step, and two frets equal a whole step.
Check out the image below to see how whole and half steps look on the guitar neck.
2. Memorize the 6 strings using mnemonics
Now that you know the 12 notes, the next step is to memorize the names of the open strings—this is your starting point for finding other notes up and down each string.
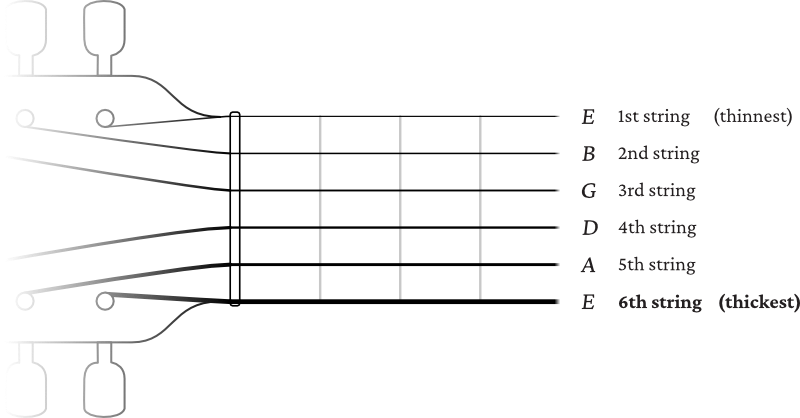
From the lowest (thickest) string to the highest (thinnest), the open strings are:
E – A – D – G – B – E
Going from low to high strings, some common mnemonics are:
- Eat All Day Get Big Easy
- Every Amateur Does Get Better Eventually
- Every Apple Does Go Bad Eventually
Otherwise, you can try coming up with your own mnemonic to remember the strings. You can also make one from highest to lowest strings which would be E, B, G, D, A, and E.
For example: Every Boy Gets Dessert After Eating.
3. The notes on the 1st and 6th strings are the same
The lowest and highest strings are both E, just in different octaves. That means you only need to memorize five unique string names, not six!
The notes are the same, but they’re in different registers—the low E string sounds deeper, and the high E string sounds brighter. Still, knowing they share the same note gives you a head start as you work your way around the fretboard.
Check out the image below to show you what I mean.
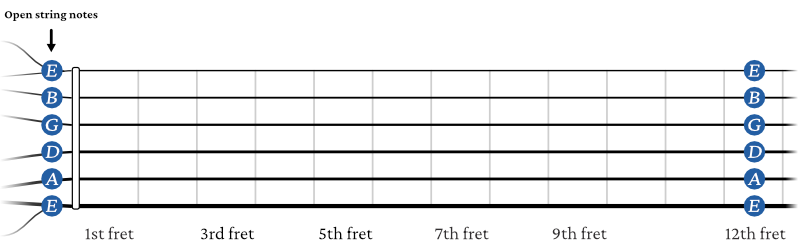
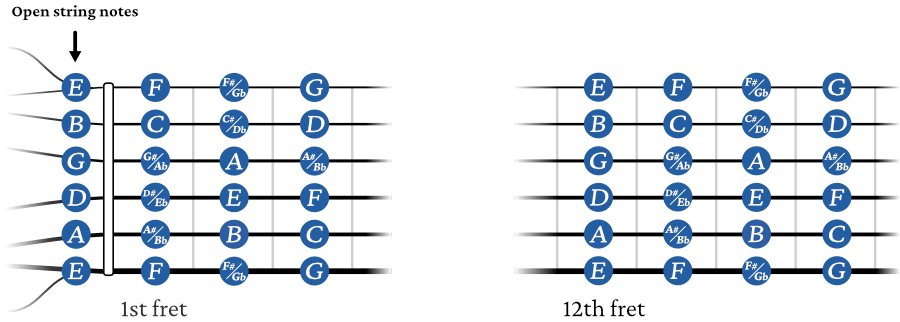
3. Open strings and the 12th fret are the same
Here’s another useful trick to speed up your fretboard note knowledge:
Each open string repeats the same note at the 12th fret.
In other words, the note on the open string and the note at the 12th fret are the same—just one octave apart. This is a great reference point as you move up the neck.
You’ll often see the 12th fret marked with double dots on the side and face of your fretboard, making it easy to spot. Use it as an anchor to help you visualize and memorize the notes in both lower and higher positions.
This also helps you to navigate when looking for other notes that are higher up on the fretboard.
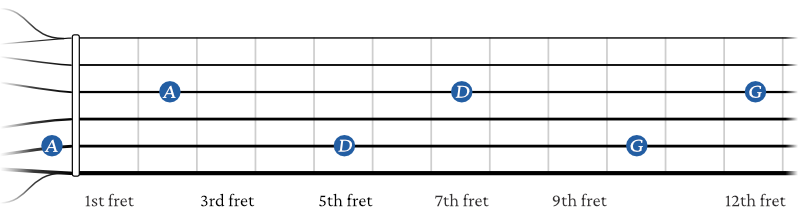
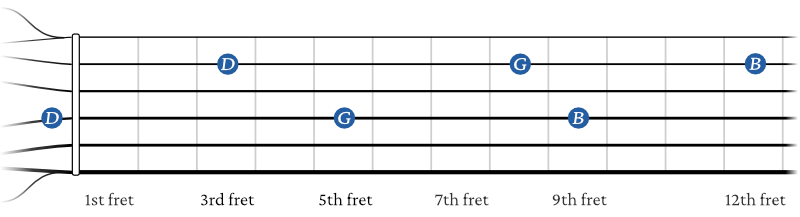
4. Finding the octave shapes
Another helpful trick is learning how to find octave shapes on the fretboard.
For example, if you play a note on the 6th string, you can find the same note one octave higher by going up two strings and over two frets. So if you play a note on the 6th string, just move to the 4th string, two frets higher.
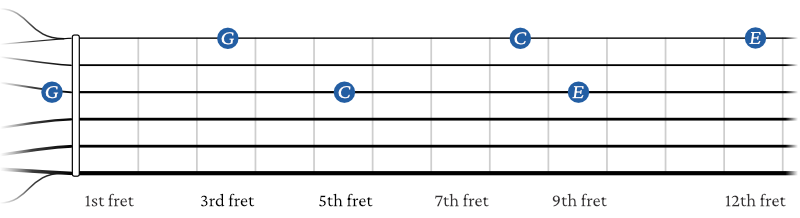
You will see examples of these octave shapes with different notes in the image below:

This same shape works from the 5th string to the 3rd string as well.
For the 4th string you have to skip a string but over 3 frets like this:
The same goes for the 3rd string above (skip a string and go 3 frets over).
5. Learn the notes by sections
Now that you have a better grasp of how to find notes on the fretboard, it’s time to break the fretboard into smaller sections and memorize them bit by bit.
Start by focusing on the notes from the open strings up to the 5th or 6th fret. Get really comfortable with this area first—it’s where a lot of beginner and intermediate playing happens anyway.
Once you feel confident there, move on to the next section (frets 6–12), and so on. This step-by-step approach keeps things manageable and helps the notes really stick.
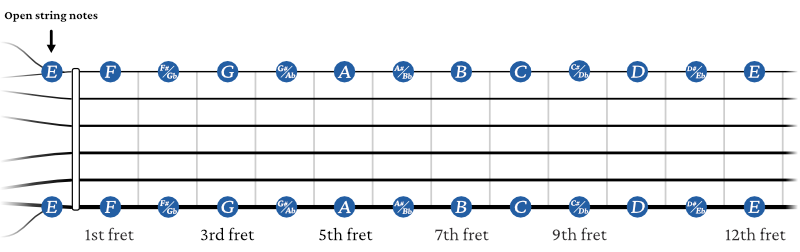
Notes on the fretboard – open to 6th fret
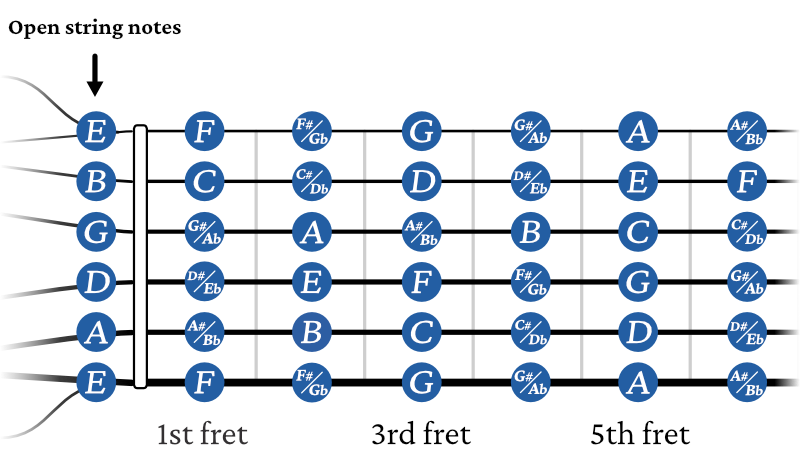
Once you have these notes down, try memorizing the notes on frets 7 through 12.
Notes on the fretboard 7th to 12th fret
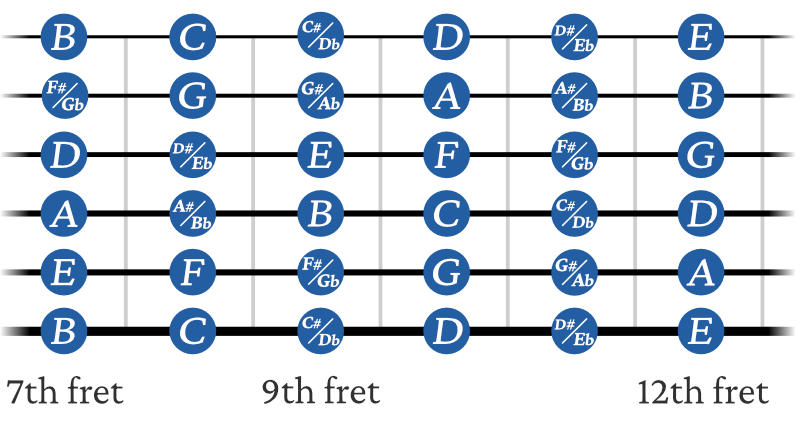
The good news is that after the 12th fret, all the notes repeat.
For example, the note on fret 1 is the same as fret 13, fret 2 matches fret 14, and so on.
This repetition means that once you learn the notes up to the 12th fret, you’re essentially learning the entire fretboard—just shifted up an octave!
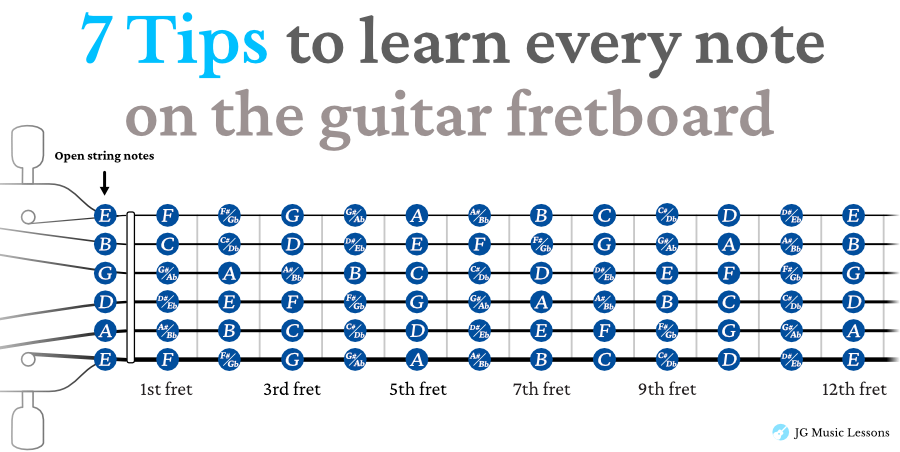
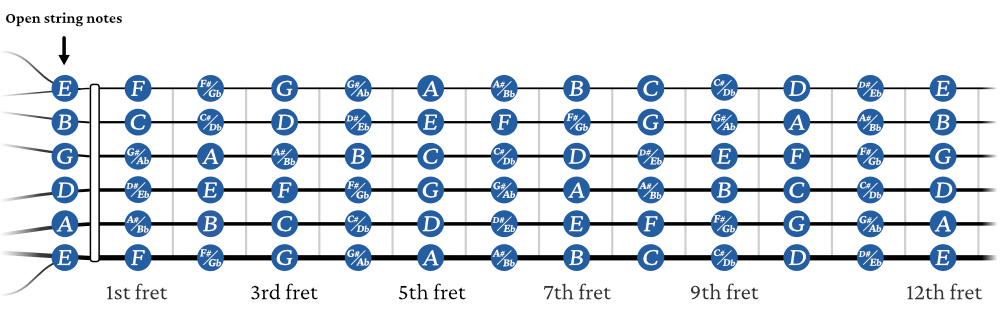
All of the guitar fretboard notes
Finally here are all the notes on the fretboard from the open strings to the 12th fret.
6. Random fretboard notes game
Once you’ve worked through all the previous tips, you should feel much more confident in finding notes anywhere on the fretboard.
A fun and simple way to reinforce this is by turning it into a game:
Press down on a random fret and string, then try to name the note.
It might take a few seconds at first, but with regular practice, you’ll get faster and more accurate. This is a great way to build both speed and muscle memory.
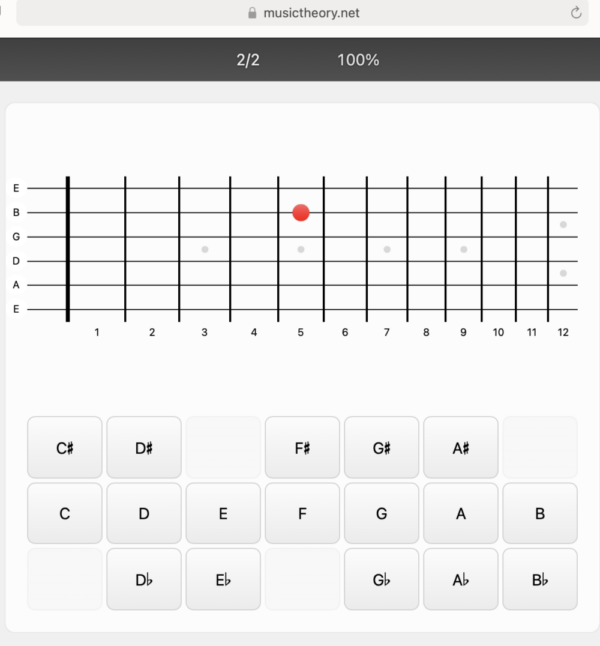
You can also check out music theory.net which offers a free, customizable fretboard quiz that lets you test your knowledge in a fun and engaging way.
Here’s what the note game looks like below:
7. Add note review to your practice routine
Like any new information you want to retain, regular review is key to keeping it fresh in your mind.
Consistency is what helps turn short-term knowledge into long-term mastery. So make it a habit to test your note knowledge every time you pick up your guitar—even if it’s just for a minute or two.
No matter how you like to structure your practice—like the method I share in the 7 Minute Practice Session—this simple routine can go a long way in helping you truly master the fretboard.
Included in Pro Membership ✨
Wrapping up
By learning the notes across the entire fretboard, you’ll develop a deeper understanding of what you’re playing and gain the flexibility to navigate any area of the guitar with confidence.
There are countless benefits to knowing your notes—like being able to learn new scales, chords, melodies, and improvise more freely.
Be sure to review the notes regularly, even after you’ve learned them. This knowledge will continue to support you in other areas of your playing, like learning scales and soloing. For example, check out these lessons to dive deeper:
I hope these tips give you the confidence to play the right notes and help you see the fretboard more clearly every time you pick up your guitar!
📘 Get the free Practice Blueprint: Build better habits and make your progress more consistent. Download the free guide →