Struggling to keep your chord changes smooth and on time? You’re not the only one. Switching between chords is one of the biggest hurdles for beginner guitarists, but it’s also one of the most rewarding skills to master.
The good news is, with the right practice strategies, you can overcome this challenge and start playing songs with confidence.
In this lesson, we’ll cover 6 practical tips to help you switch chords faster and cleaner:
- Press and release exercise
- Use common notes between chords
- Limit switching to two chords at a time
- Visualize your next chord before you switch
- Remove unnecessary movements
- Practice with a metronome
Let’s dive in!
✨ This PDF is included free with Pro Membership
1. Press and Release Exercise
First, here is a simple exercise to be able to play a chord much quicker.
Start by forming a chord you want to learn (e.g., C Major). Press all fingers down, then completely release them. Wait a moment then press down on the chord again.
Repeat this slowly and intentionally.
This “press and release” method trains your fingers to remember the chord shape, building muscle memory and finger strength at the same time. Think of it like a gym workout for your fretting hand. At first it feels awkward, but over time your fingers will respond faster and more accurately.
In short: Build muscle memory for one chord before worrying about fast changes.
✔️ Pro Tip: Start with beginner friendly chords, then work your way up to tougher ones like barre chords.
2. Use Common Notes Between Chords
One of the fastest ways to improve your transitions is to spot shared fingers between chord shapes and use them as pivot points.
Let’s look at a few examples between basic chords (common notes are highlighted in green):
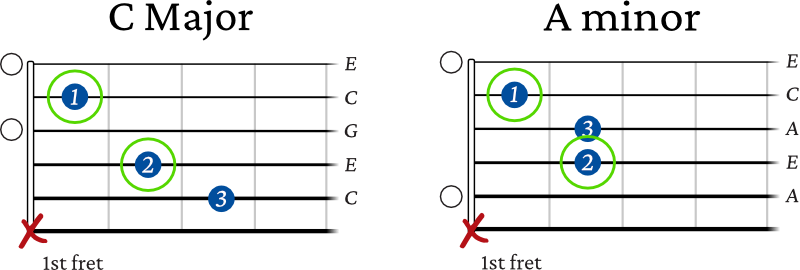
The C Major and A minor chords share two notes in common which are the 1st and 2nd finger on your fretting hand. All you need to do to make the transition is to add or remove your 3rd finger on the fretting hand.
Another example is between a G Major and a D Major Chord. They both share the note on the 3rd finger for each chord shape.

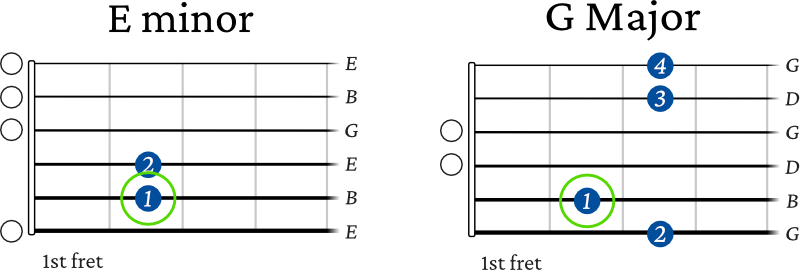
The E minor and G Major chord share the 1st finger on both chord shapes.
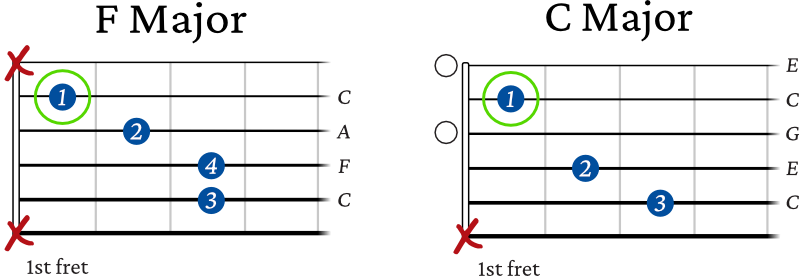
The F Major and C Major chord also share the 1st finger on both shapes.
By finding these overlaps, you reduce the number of finger movements, making transitions quicker and smoother.
✔️ Remember: shared fingers = faster transitions.
3. Limit Switching to Two Chords at a Time
If a full progression feels overwhelming, break it down. Focus on just two chords at a time.
Go back and forth slowly:
C → F → C → F…
This laser focus will give your fingers the repetition they need without overload.
Once that pair feels easier, move on to the next two chords in the progression. Eventually, you’ll chain them together effortlessly.
At this point, don’t worry about strumming patterns until you learn to place your fingers properly for the chords you’re working on.
With some practice, you’ll soon find yourself expanding to comfortably transition between 3 chords or more. Try this concept to learn easy chord progressions.
🎸 Want to finally play through songs without getting stuck on the chords? Grab the Guitar Essentials eBook – a step-by-step guide with 100+ exercises and audio examples.
4. Visualize Your Next Chord Before You Switch
One of the biggest game-changers in speeding up your transitions is mental visualization.
Before you even lift your fingers, imagine where each one needs to go next. Picture the shape. Know what it feels like.
Looking ahead like this gives your hands a split second head start and that makes all the difference in staying on time.
💡 Visualization is especially helpful when two chords don’t share any common fingers.
5. Remove Unnecessary Movements
Beginner guitarists often lift fingers too far off the fretboard or apply more pressure than needed. These habits slow you down and create extra tension.
Try this:
- Watch your hand in a mirror or phone video. Are you “flinging” fingers off the strings?
- Experiment with how lightly you can press a string and still get a clean tone.
- Loosen your grip between changes. Tension = slower transitions.
Efficiency is key. The less movement, the smoother the switch.
6. Practice With a Metronome
Once you’re starting to feel more comfortable with your chord changes, test your timing using a metronome.
Start slow, around 50–60 BPM and aim to change chords every 4 beats.
Here is a free metronome on our site.
As you improve:
- Gradually increase the tempo
- Try switching every 2 beats
- Layer in strumming patterns
If needed, here are 7 ways to get better at strumming on guitar.
Now let’s put everything together with a 5-minute chord switching drill you can try today:
5 Minute Chord Switching Drill
- Pick two chords (start with something simple, like C → Am).
- Switch back and forth slowly for 2 minutes. As you do, visualize your next chord shape before you move. Picture where your fingers will land.
- Play along with a metronome (start slow, around 60 BPM) for 2 minutes.
- For the last minute, increase the tempo by 5–10 BPM to challenge yourself.
Five focused minutes a day can make your chord changes feel smoother in just a couple of days.
✨ This PDF is included free with Pro Membership
Wrapping Up
Learning to switch chords smoothly takes time, but it doesn’t have to be frustrating. If you break it down, stay consistent, and keep these six tips in mind, your transitions will improve faster than you think.
Take breaks when needed, but keep at it. And remember: each small improvement compounds.
Check out our songs with tabs page to start applying these concepts.
You might also like this lesson on how to effectively memorize guitar chords.
📘 Get your free Guitar Practice Blueprint here →
Start Playing Better, Faster
with Pro Membership! ✨
Get the guidance, tools, and support that keep your progress on track:
🏁 Always know what to practice next. Access the full Guitar Learning Roadmap with lessons in sequence.
🎼 Play songs with confidence. Step-by-step lessons of popular, classical pieces and other styles.
📙 Save time and frustration. Clear PDFs and ebooks that save time so you can focus on playing.
🎟️ Get rewarded for consistency. 2 free downloads every month (a $240+ yearly value).
🎁 Keep costs low while you grow. 50% off all charts, tracks, and posters — up to 75% off bundles.
🚫 Stay focused. Ad-free environment keeps you in the zone.
💬 Get help when you need it. Direct member support to keep you on track.


