

Do you ever feel like your guitar playing is “caged”?
Most guitarists spend years locked in the first three frets. You know your open chords (aka open C, A minor, G, E minor, D) and maybe a few barre chords, but the rest of the neck feels like foreign territory. You have no idea how to navigate it.
You see pros sliding effortlessly up the neck, playing sweet-sounding chords that don’t sound clunky or muddy like your open chords do.
You might think you need to memorize hundreds of chord shapes. You don’t. What you need is to understand how the shapes you already know repeat across the fretboard, and more importantly, when and why to use them.
In this lesson, we’re going to stop memorizing disconnected shapes and start using a strategic approach by playing in “neighborhoods” (more on that later). By the end, you’ll have way more confidence in navigating the fretboard.
Skill Builders Roadmap Focus · View Roadmap →
Your goal is to use root notes on the 6th and 5th strings to find familiar chords higher on the neck, then play one chord progression in a fretboard area beyond first position. Focus on choosing nearby chord shapes instead of jumping around the neck.
1. The “Safety Blanket” of the 1st Position
The biggest reason most players stay at the 1st position is comfort. We learn the “Big 5” open chords (C-A-G-E-D) and stay there because it’s familiar. The headstock is visible, the shapes are memorized, and it works well enough.
What you might not have realized is that those open chords you know can be played as movable shapes throughout the fretboard. For example:
Movable Major shapes using the “Big 5”
For a quick reference of how you can shift chords, see how you can shift the familiar chords to different root notes on the same string (this works for any triad, shell or 7th chords that you already know in first position).
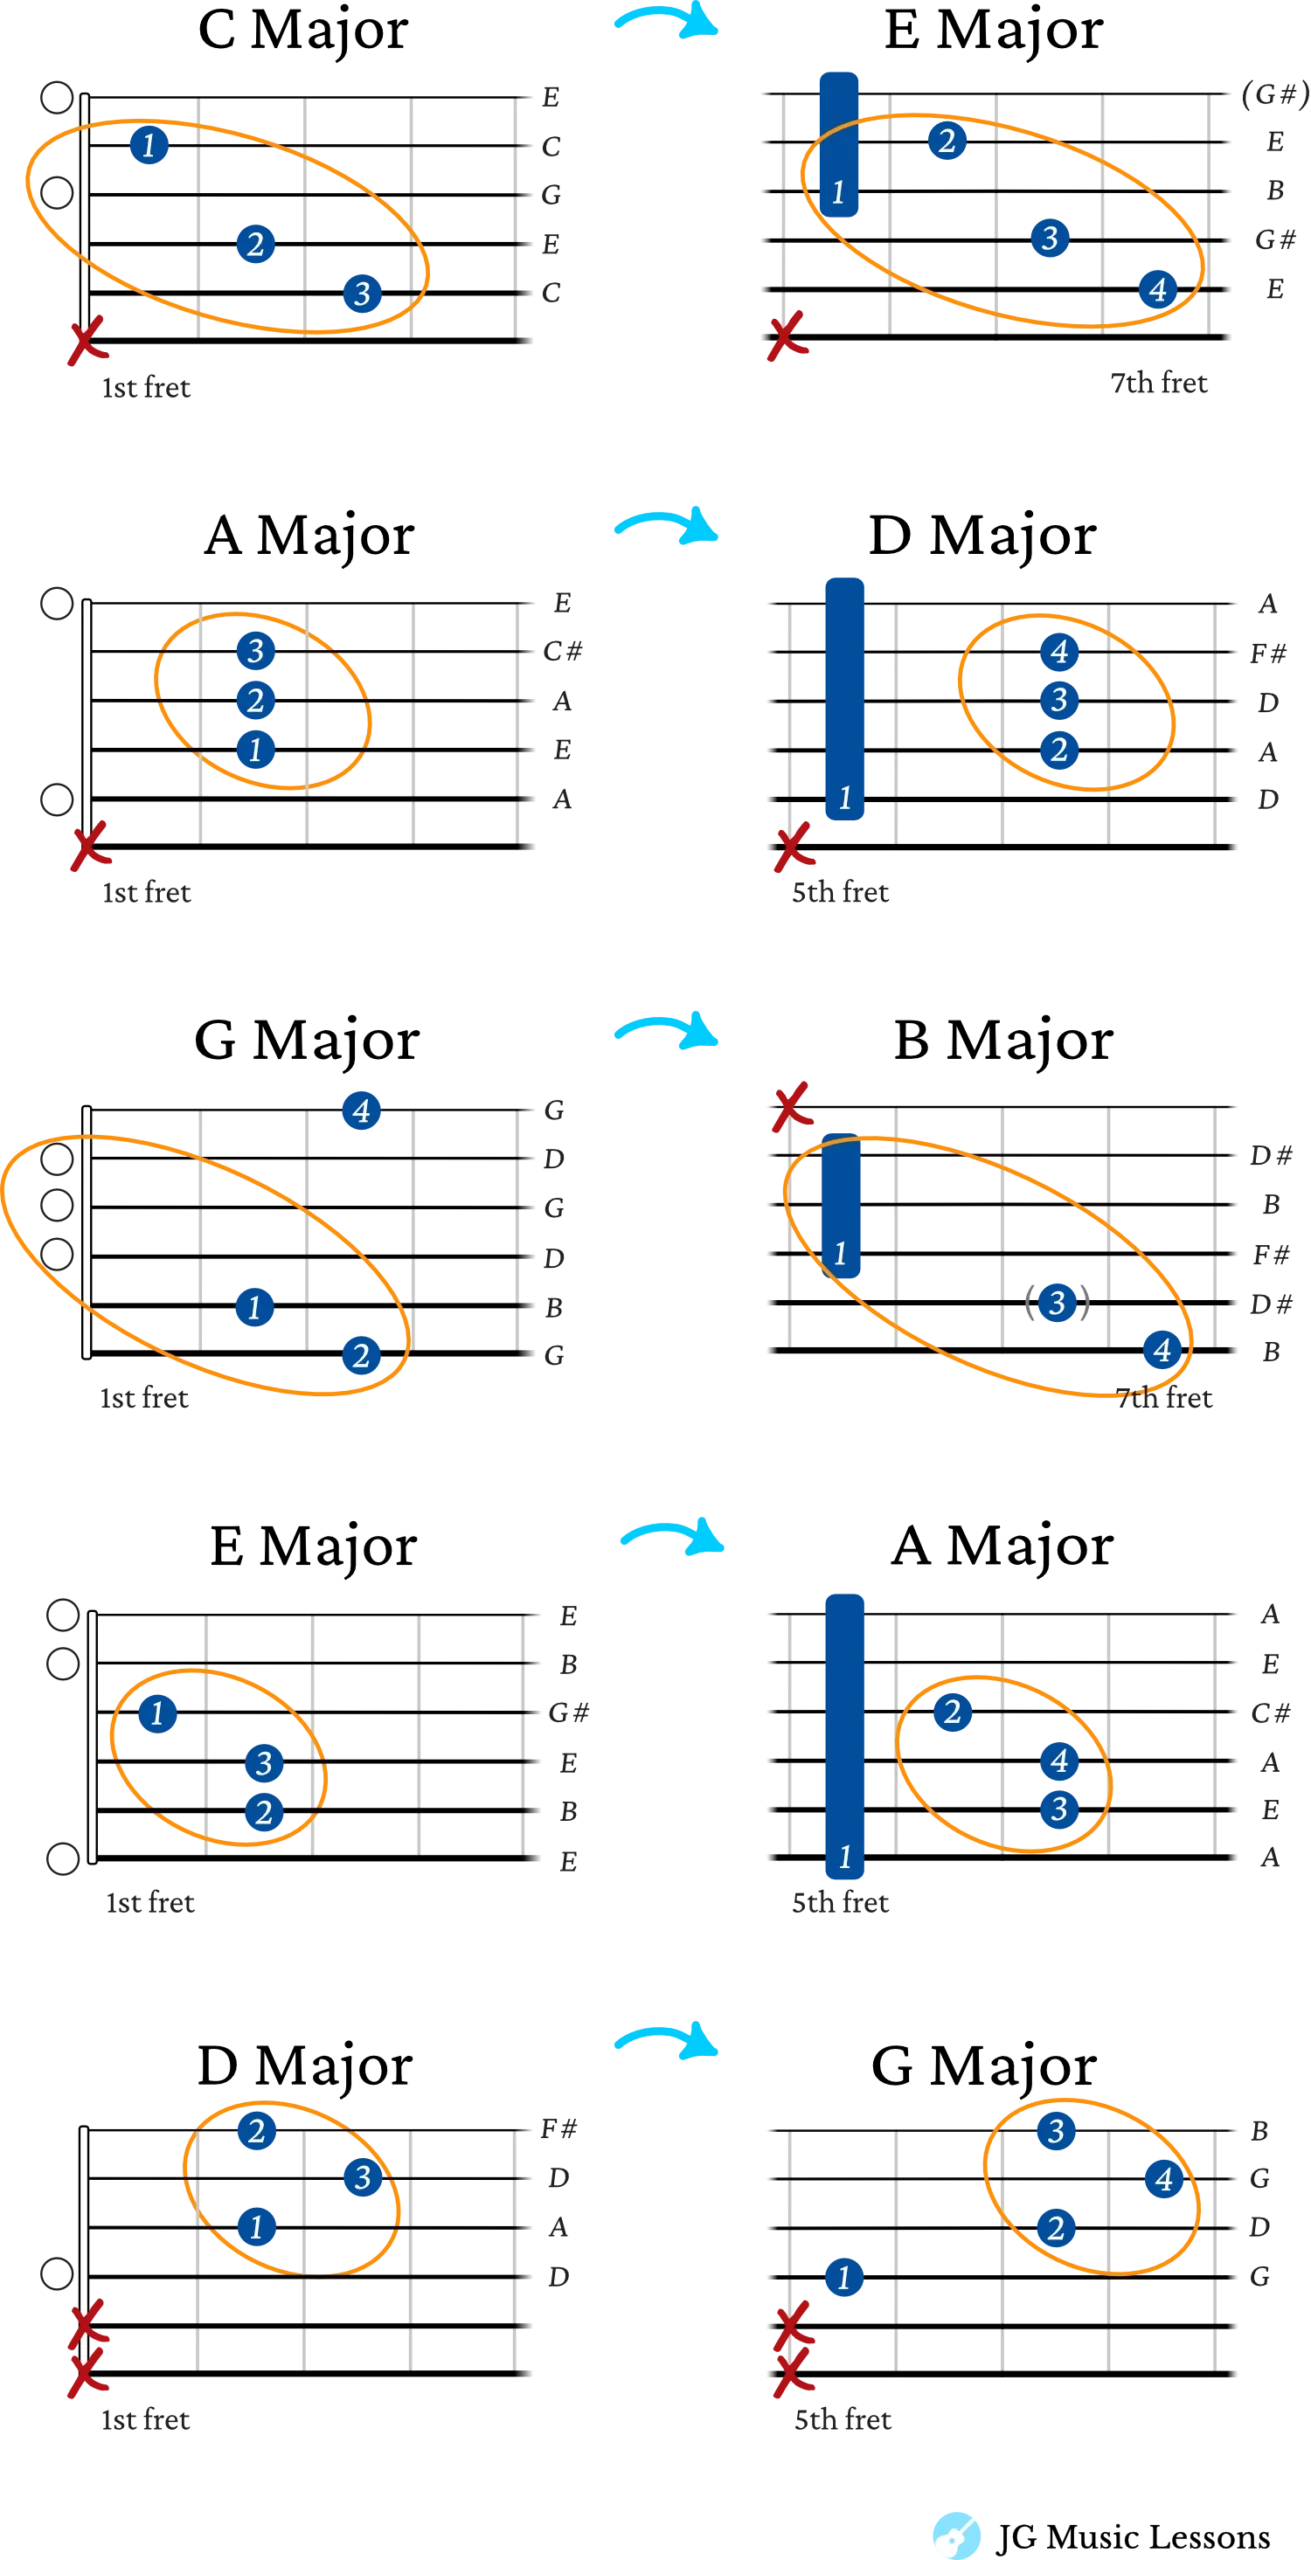
For minor chords like open A minor, E minor, and D minor chord, the same principle applies.
The problem is that knowing these shapes can move doesn’t mean you know where to move them or why.
That’s where most players get stuck. You learn barre chords, play them a few times, then default back to open position because you don’t have a system to shift them around.
That’s what we’re fixing next.
2. The Fretboard GPS: Finding Your Landmarks
To navigate the neck, you don’t need to memorize every single note today. You just need landmarks.
Take a look at the dots on your guitar fretboard (most guitars have these):
- The 5th Fret: Your second major “home base” (after the first position)
- The 7th Fret: Your third anchor point
- The 12th Fret: Where the entire pattern repeats (one octave higher)
These landmarks give you reliable reference points as you start finding root notes and chord shapes farther up the neck.
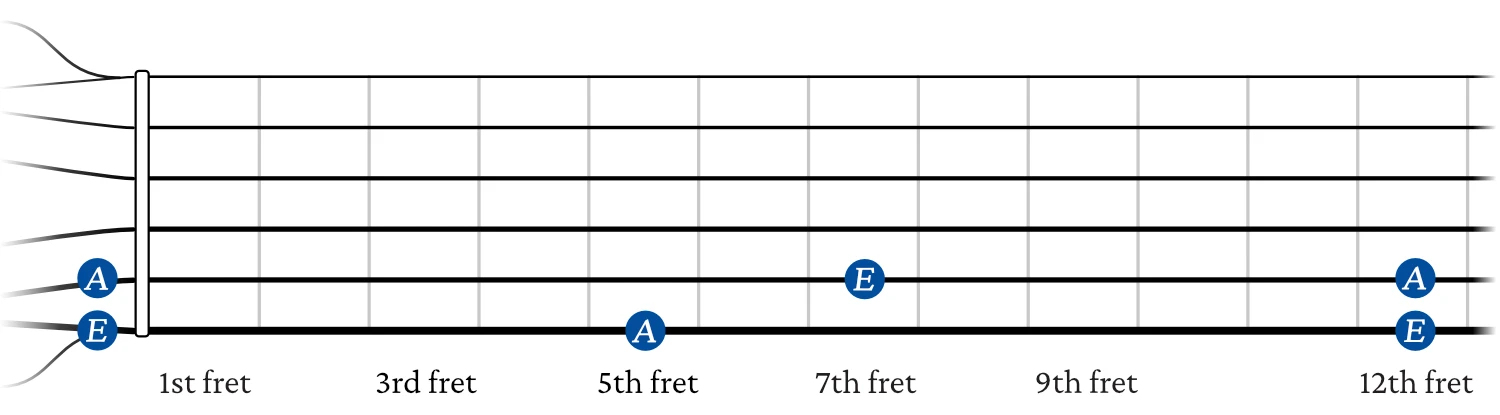
Here’s a shortcut: You can go a long way just knowing your anchor notes on the 6th string (low E) and 5th string (A).
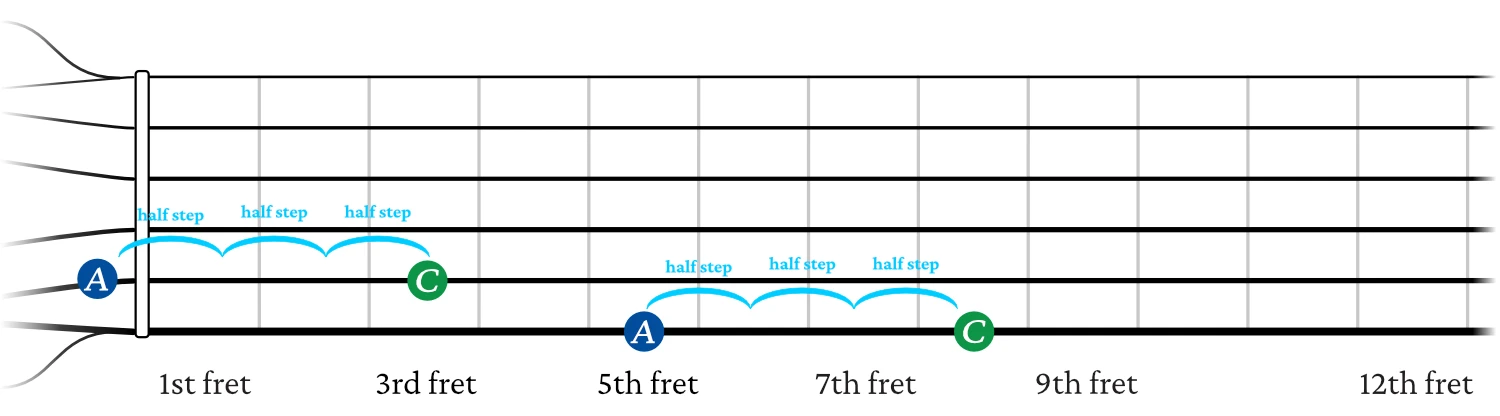
Example: Want to play a C major chord in a higher position? Find the C note on your 6th string using these anchor points. C is 3 frets up from open A, so count 3 frets up from your 5th-fret anchor, then build your chord from there.
Or if you want to play a G chord higher up, count the same half steps from the open note and the anchor point higher up like this:
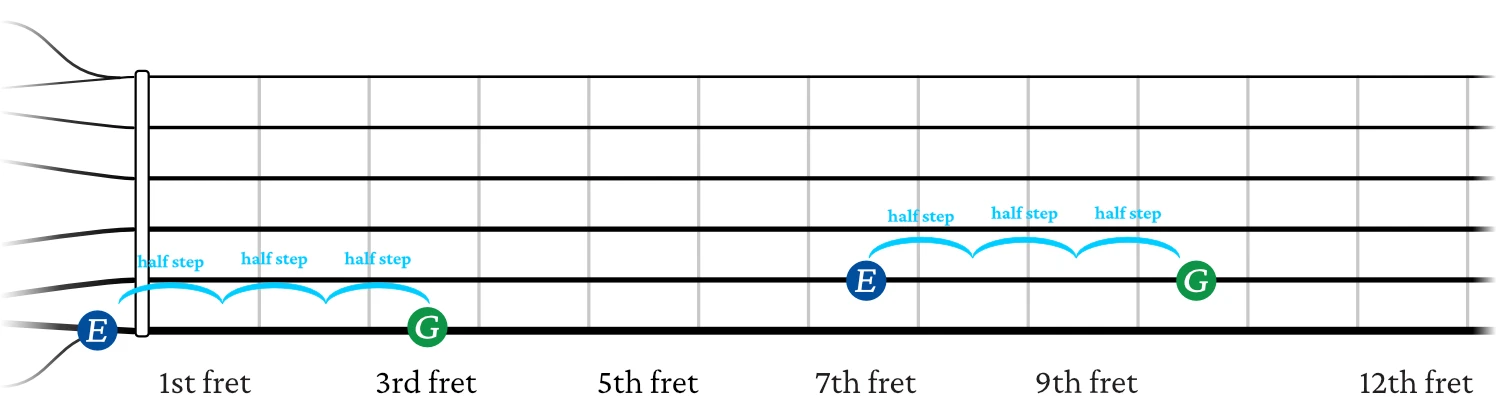
This simple system unlocks the entire fretboard. Once you know where your root notes are, you know where your chords live.
Now that you know how to find chords anywhere, let’s talk about the strategic part: staying in one area instead of jumping around randomly.
3. The “Neighborhood” Strategy: Efficiency over Effort
If I asked you to memorize 50 different chord shapes, you’d probably quit. But what if I told you that most of your favorite songs can be played within a single 4-fret “neighborhood”?
Here’s the idea: A “neighborhood” is a small area of the neck, usually about 4 to 5 frets wide, where you look for nearby versions of the chords in a progression. Instead of automatically returning to open position or jumping across the neck, you stay in one area and choose the closest useful shapes.
If you want to make it stick, you can think of it like this:
1st to 4th fret = Zone 1 (the familiar)
5th to 8th fret = Zone 2 (the sweet spot)
9th to 12th fret = Zone 3 (the upper register)
12th and beyond = Zone 1 repeated (the octave up)
Instead of jumping your hand from the 1st fret all the way to the 10th fret for the next chord, you learn to find the closest version of that chord within the same neighborhood.
Why this matters:
- Your hand moves less between chords
- Transitions can feel smoother and more connected
- You get more comfortable using different areas of the fretboard
- You start choosing chord positions intentionally instead of defaulting to the shapes you always use
Example: The “7th Fret Neighborhood”
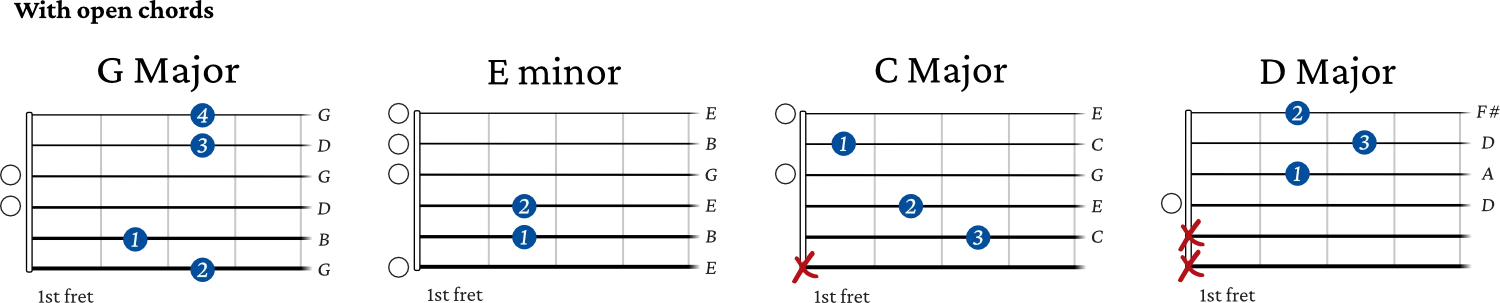
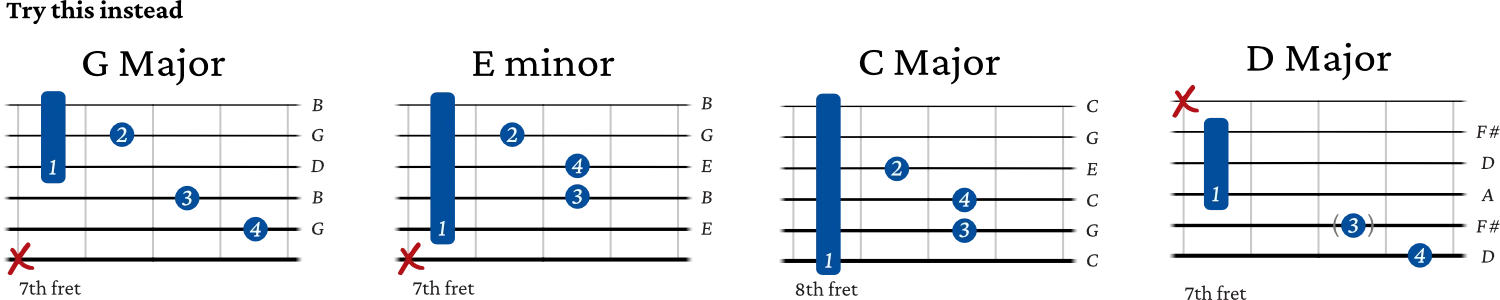
If you’re playing a song in the key of G, you don’t have to leave the 7th fret area. This is very common where guitar parts are played higher and the song calls for it (whether it’s after a riff or introduction).
Instead of this:
You can play this (staying in the 7th fret neighborhood):
Now let’s put it to work. Same progression, three zones, two chord flavors each.
The Challenge: The “Same Progression, Three Zones” Drill
Included with Pro
Take this lesson a little further.
This bonus section is included with Pro Membership. Pro also gives you the full Guitar Roadmap to keep your learning in order, plus direct access to me when something isn’t clicking.
Already a member?
Log in →
Included in Pro Membership ✨
Summary: Start Seeing Chords Across the Neck
Moving beyond first position gets easier when you stop treating every chord shape as a separate thing to memorize. Root notes give you landmarks, and the chord shapes you’ve already learned give you ways to build from those landmarks.
Pick a progression you already know and find a way to play it in one area higher on the fretboard. Use the 6th- and 5th-string root notes to place your shapes, then look for nearby versions of each chord so your hand doesn’t have to jump around the neck.
Once one higher position feels familiar, try the same progression in another neighborhood or swap in some of the 7th chords, shell chords, or triads you’ve already worked on in this module.
Before continuing
You’re ready to continue when you can use root notes on the 6th or 5th string to locate familiar chords and play one chord progression in a higher fretboard neighborhood without automatically returning to first-position shapes.
Next: Continue in the Skill Builders Roadmap to see where this skill fits and what to practice next.
📘 Get the free Practice Blueprint: Build better habits and make your progress more consistent. Download the free guide →